7. Song Meter Configurator App Overview
This section provides an overview of the Song Meter Configurator app interface. It describes how to navigate the app and what settings, functions, and information you will find in each part of the app. How to use these components is described in much greater detail in the following sections:
For instructions on tasks that involve using the Song Meter Configurator app to start a deployment, see Deploying the Song Meter Mini Bat 2.
For instructions on configuring the settings on a Song Meter Mini Bat 2 using the Song Meter Configurator app, see Configuring the Song Meter Mini Bat 2. This section includes descriptions of all available settings and detailed instructions on designing a custom schedule (see Design a Custom Schedule).
For instructions on maintaining the recorder, such as updating its firmware and testing the microphone, see Maintaining and Protecting the Song Meter Mini Bat 2.
About the Song Meter Configurator App
The Song Meter Configurator app provides a simple interface for configuring the schedule and settings of the Song Meter Mini Bat 2. It runs on phones and tablets running iOS and Android, and, once installed, it does not require an internet connection. See Install the Song Meter Configurator App.
Important
While you can configure most settings without using the app by loading a .miniconfig file from an SD card, you must use the app to set the recorder's clock. The recorder will not run its recording schedule if its clock has not been set.
The Song Meter Configurator app communicates with the recorder via Bluetooth connection. By default, the recorder broadcasts periodic status beacons that can be received by the Song Meter Configurator app running on nearby devices, even when the app is not paired with the recorder.
The app can also be paired with one recorder at a time for two-way communication. When paired to a recorder, the Song Meter Configurator app can be used to program the recorder's settings in real time. You can also transfer configuration files between the paired recorder and the app's Configuration Library.
The Song Meter Mini Bat 2 recorder uses the Bluetooth Low Energy protocol to communicate with the Song Meter Configurator app.
Note
The process for pairing the Song Meter Mini Bat 2 with the Song Meter Configurator app is not the same as the process you might use for pairing common Bluetooth accessories, like headphones. See Pair the Recorder with the Song Meter Configurator App for pairing instructions.
By default, when the Song Meter Mini Bat 2 recorder is powered on, it generates a Bluetooth status beacon once every few seconds. If the recorder is within Bluetooth range of the mobile device, the Song Meter Configurator app will automatically detect the Bluetooth status beacon and the recorder will be detected and displayed in the Recorders screen of the app.
It is possible to disable the recorder’s Bluetooth status beacons from the Configuration Editor screen (see Send Bluetooth Beacons?). If Bluetooth beacons are disabled, the recorder will not be detected by the app unless the button on the recorder is pressed and held for three seconds.
Note
The usable range of a Bluetooth signal varies from phone to phone and tablet to tablet, but it is usually under 30 feet, assuming a clear line of sight between the Song Meter Mini Bat 2 and the phone or tablet.
An internet connection is required to install the Song Meter Configurator app from the Apple App store or Google Play store. Once the app is installed, an internet connection is not required for any of the core functions of the app. You can manage and program your recorders using only local, Bluetooth communication.
Note on GPS and Location Data
The Song Meter Configurator can use your device's real-time location to automatically save deployment location to the Song Meter Mini Bat 2 (see Automatically Set the Recorder’s Deployment Location). Location data can also be entered manually in the Location & Time Zone Screen. This location is saved to each audio file for later reference.
Most cellular-enabled devices, such as smartphones and some tablets with paid cellular plans, are equipped with a GPS antenna that receives information broadcast from GPS satellites orbiting Earth. This GPS data does not travel through the cellular network, so a smartphone can receive location information from GPS even when not in range of a cellular tower. The map data shown on the Location & time zone screen may not be visible without an internet connection, but the device's location coordinates do not rely on the Internet.
Most non-cellular-enabled devices, like tablets without a paid cellular plan, do not have a GPS antenna. These devices may be able to track approximate location data from nearby Wi-Fi routers, but this is generally not as precise as GPS location data, and it only works within about 50 meters of the nearest Wi-Fi router. A dedicated GPS receiver can be paired with a tablet via Bluetooth to provide more precise location data that can be used to set the Song Meter Mini Bat 2's saved deployment location.
The Song Meter Configurator app is available for Android and iOS devices.
For Android devices, download and install the Android version from the Google Play store. The Configurator app requires Android version 8.0 or later in order to run.
For iOS devices, download and install the iOS version from the Apple App Store. The Configurator app requires iOS version 12.0 or later.
Note
The Song Meter Configurator app cannot be installed if your device is running an older operating system than the minimum supported version.
The Song Meter Configurator app is available in the following languages:
English
French
Spanish
Portuguese
Chinese
German
Japanese
The display language of the Song Meter Configurator app will follow the Android or iOS system language setting. To manually set the language of the app, see App Information Screen.
Recorders Screen
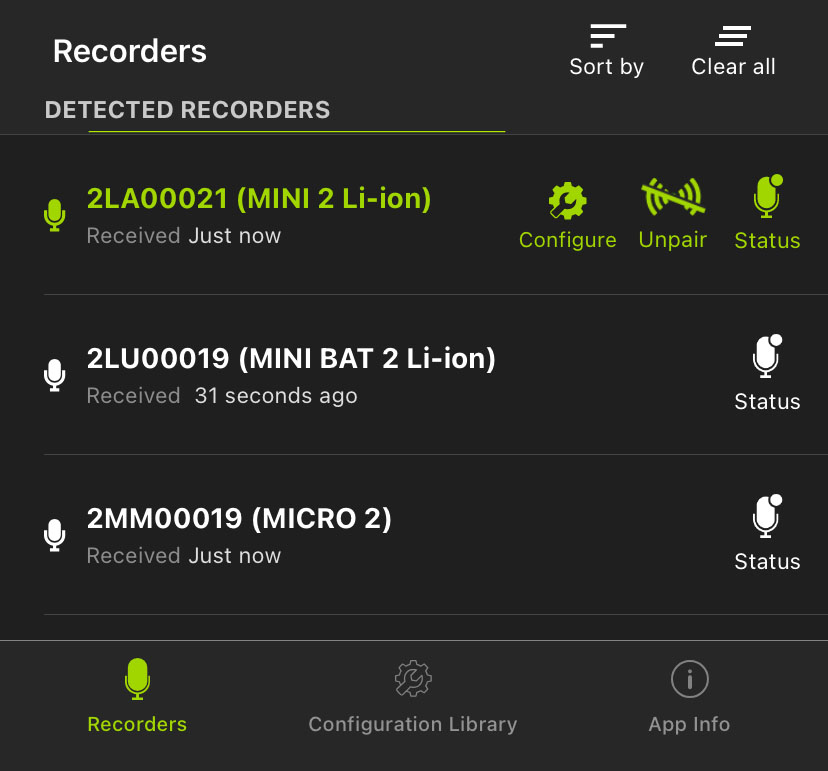 |
The Recorders screen lists each recorder within Bluetooth range and detected by the Song Meter Configurator app. Previously detected recorders that are out of Bluetooth range or powered off will remain in the list until removed.
The Recorders screen is also where you pair with a recorder in order to configure it. See Pair the Recorder with the Song Meter Configurator App for instructions on this procedure.
If a recorder is within range and powered on, but it does not show in the Recorders screen list, check whether the Send Bluetooth Beacons? utility is enabled for that recorder (see Send Bluetooth Beacons?).
Access the Recorders Screen
The Recorders screen is the first screen displayed when you open the Song Meter Configurator app. You can access the Recorders screen from the Configuration Library and App Info screens by tapping the Recorders icon in the navigation bar at the bottom of the screen.
Recorders Screen: Top Menu Bar
The top menu bar of the Recorders screen includes the following buttons, listed from left to right:
Sort by | Tap this icon to open a Sort Recorders menu with options to sort the recorders by one of two options. The currently used sort option is indicated by an upwards or downwards arrow. To toggle the sorting between ascending and descending, tap Sort by, then tap the currently used sorting option once more. The available sorting options are:
|
Clear all | Tap this icon to clear all entries from the Recorders screen. Nearby recorders that are currently broadcasting Bluetooth beacons will repopulate the Recorders list within several seconds. |
Detected Recorders List
The entries for unpaired recorders are represented by white text and icons, and they include the following information:
RECORDER NAME | The default value of a recorder's name is its serial number, but this can be changed to a custom value (see Configuration Editor Screen). |
Received | This text lists when the Song Meter Configurator app last received a status update from the recorder. This text will read Received Just now for the first ten seconds after an update. After ten seconds, it will display a duration in seconds, minutes, hours, or days. |
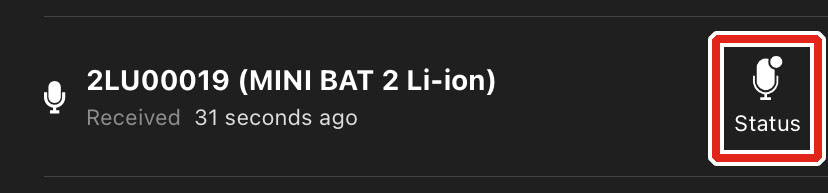
Status | Tap this icon to open the Status screen for the recorder, which displays the information the app most recently received from the recorder. See Status Screen for a breakdown of all information included on the Status screen. |
The entry for a paired recorder is represented by green text and icons. It includes the same information as unpaired recorder entries, plus two additional icons. The Song Meter Configurator can only be paired with one recorder at a time.
Configure | Tap to open the Configuration Editor screen, where you can alter the settings of the paired recorder and perform many other functions. See Configuration Editor Screen for more information. |
Unpair | Tap to unpair the Song Meter Configurator app from the Song Meter Mini Bat 2. You must unpair from the currently paired recorder before you can pair with another. |
For instructions on pairing with a recorder, see Pair the Recorder with the Song Meter Configurator App.
Lower Navigation Bar
The navigation bar at the bottom of the Recorders screen shows icons for the Recorders, Configuration Library, and App Info screens. Recorders is highlighted in green to indicate the current screen. Tap on the Configuration Library or App Info icons to navigate to those respective screens.
See Configuration Library Screen and App Information Screen.
Status Screen
 |
The Status screen displays all of the status information broadcast from a Song Meter Mini Bat 2 and received by the Song Meter Configurator app. It shows information about the recorder's SD card, batteries, schedule settings, microphones, and firmware version.
To access the Status screen for a recorder, navigate to the Recorders Screen, then tap the Status icon listed to the right of the recorder's name.
 |
When a Song Meter Mini Bat 2 is within Bluetooth range and either broadcasting Bluetooth beacons or paired with the app, its status will update in the app once every few seconds. The last-received status information for a recorder is retained by the app when the app is closed, the mobile device or recorder are turned off, or the recorder moves out of Bluetooth range.
While a Song Meter Mini Bat 2 is paired with the Song Meter Configurator app on one mobile device, it will not broadcast Bluetooth beacons for other mobile devices to receive. Only the paired mobile device will receive real-time status updates.
The Status screen displays the following information and interface elements, listed in order from top to bottom, left to right:
Top-Most Info Bar
 |
< Status (back icon) | Tap this icon to exit the Status screen and return to the Recorders screen. |
Last Updated | This text indicates when the Song Meter Configurator app last received status information from the selected recorder. |
Paired/Unpaired | This text indicates whether the recorder is paired with the app or not. |
New Firmware Alert
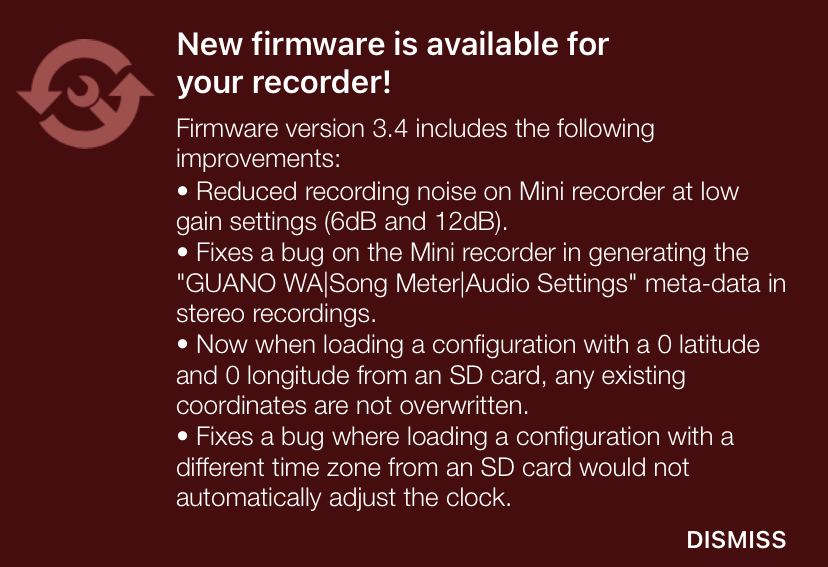 |
If the app detects that the recorder is running an older firmware version than the latest available, a message will be displayed below the top-most info bar. This message includes a link to instructions on updating the firmware as well as release notes for the latest available firmware version.
To close this alert, tap DISMISS.
Microphone Level Panel
 |
This panel is only visible when the recorder is paired with the app. It displays a real-time representation of the incoming signal level for any currently installed and active microphone.
Note
If the Song Meter Mini Bat 2 is currently recording only on the left microphone, then the level meter for the right microphone will not respond to sound, even if the right microphone is installed.
ULTRASONIC LEVEL | This meter displays a real-time representation of the volume of sound being picked up by the ultrasonic microphone if the recorder is currently running an ultrasonic recording period. |
ACOUSTIC LEVEL | If an acoustic microphone is installed and the recorder is currently running an acoustic recording period, this meter displays a real-time representation of the volume of sound being picked up by the acoustic microphone. |
Storage Info Panel
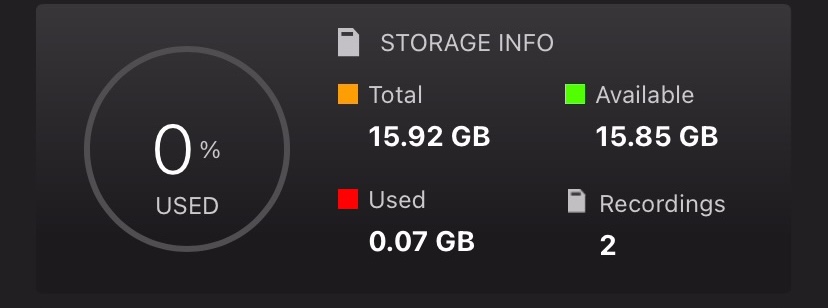 |
Error Message Readout | If there is a problem with the SD card, an error message will be displayed underneath the STORAGE INFO text. See SD Card Error Messages for descriptions of common error messages. | ||||||||||||||||||||||||||||||||||||||||||||||||
Storage Percentage Used | This circular graph and percentage text indicate what proportion of the available space on the SD Card has been used. | ||||||||||||||||||||||||||||||||||||||||||||||||
Total | In gigabytes, shows how much total space, used and available, is present on the SD card. | ||||||||||||||||||||||||||||||||||||||||||||||||
Available | In gigabytes, shows how much space is unused and available for recording storage on the SD card. | ||||||||||||||||||||||||||||||||||||||||||||||||
Used | In gigabytes, shows how much space on the SD card is occupied by recordings or other data.[a] | ||||||||||||||||||||||||||||||||||||||||||||||||
Recordings | Number of separate recording files saved to the SD card since the recorder was last powered on. This number will reset to zero when the recorder powers off or when the SD card is reformatted. | ||||||||||||||||||||||||||||||||||||||||||||||||
[a] If the contents of an SD card were "Moved to trash" using a computer, that space may still be shown as Used in the Status screen. Formatting the SD card will make all of the card's space available. See Format the SD Card. | |||||||||||||||||||||||||||||||||||||||||||||||||
Other Info Panels
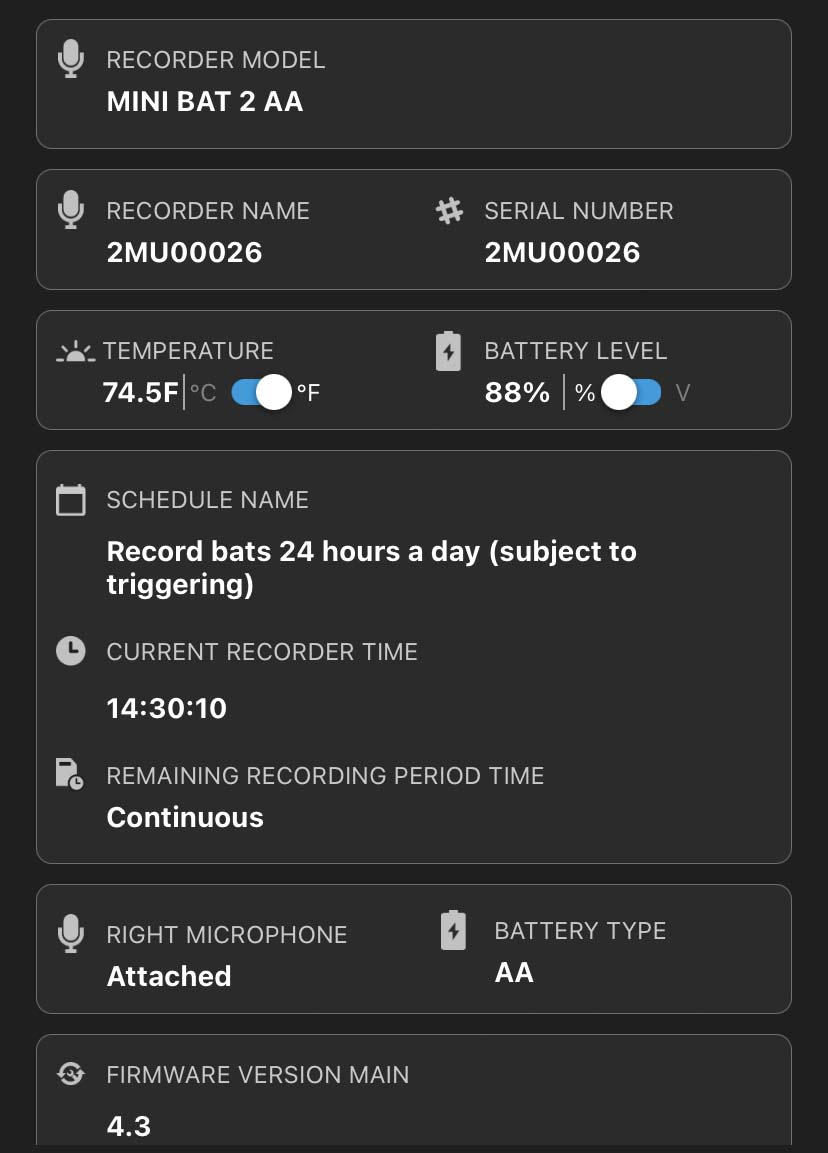 |
RECORDER MODEL | Displays the model name of the recorder. | ||||||||||||||||||||||||||||||||||||||||||||||||
RECORDER NAME | Displays the name of the recorder. By default, the name is the recorder's serial number, but it can be customized in the Configuration Editor Screen. | ||||||||||||||||||||||||||||||||||||||||||||||||
SERIAL NUMBER | Displays the serial number of the recorder. The same serial number is also printed on the right side of the recorder's enclosure. | ||||||||||||||||||||||||||||||||||||||||||||||||
TEMPERATURE | Displays the temperature reading from the Song Meter Mini Bat 2's internal temperature sensor. The °C/°F toggle switch allows you to set the units of temperature to degrees Celsius or Fahrenheit. | ||||||||||||||||||||||||||||||||||||||||||||||||
BATTERY LEVEL | Displays the state of the recorder's batteries. The V/% toggle switch determines whether the battery level is displayed as a Voltage reading or an estimation of the remaining battery life percentage.[a] | ||||||||||||||||||||||||||||||||||||||||||||||||
SCHEDULE NAME | If the recorder is running one of the preset schedules, selected from the Configuration Editor screen, the name of the schedule will be displayed here. If the recorder is running a custom schedule, Custom Schedule will be displayed here. | ||||||||||||||||||||||||||||||||||||||||||||||||
CURRENT RECORDER TIME | Displays the time of the recorder's internal clock. If the app is not currently receiving status updates from the recorder, the time of the last received status update is shown instead. | ||||||||||||||||||||||||||||||||||||||||||||||||
START TIME OF NEXT RECORDING | If the Song Meter Mini Bat 2 is not currently recording, this displays the time of the recorder's next scheduled recording period. This text will only display if an SD card is installed with enough available space for the next recording period. | ||||||||||||||||||||||||||||||||||||||||||||||||
REMAINING RECORDING PERIOD TIME | If the Song Meter Mini Bat 2 is running a preset schedule and is currently recording, this the amount of time remaining in the current recording period. If the recorder is running a 24-hour schedule, this will read Continuous. This information is not displayed for recorders running custom schedules. | ||||||||||||||||||||||||||||||||||||||||||||||||
RIGHT MICROPHONE | Displays Attached or Not Attached to indicate whether a right-hand microphone is installed and detected by the Song Meter Mini Bat 2. | ||||||||||||||||||||||||||||||||||||||||||||||||
BATTERY TYPE | Indicates which type of battery is powering the recorder. AA refers to AA batteries of any type, including alkaline, NiMH, and Energizer® Ultimate LithiumTM (Lithium/Iron Disulfide). Lithium refers to 18650 lithium-ion batteries. | ||||||||||||||||||||||||||||||||||||||||||||||||
FIRMWARE VERSION | Displays the recorder's installed firmware version. | ||||||||||||||||||||||||||||||||||||||||||||||||
[a] For AA batteries, the battery life percentage is estimated based on the typical behavior of alkaline AA batteries. The battery life percentage estimate is not accurate for NiMH batteries or Energizer® Ultimate LithiumTM batteries. | |||||||||||||||||||||||||||||||||||||||||||||||||
Configuration Editor Screen
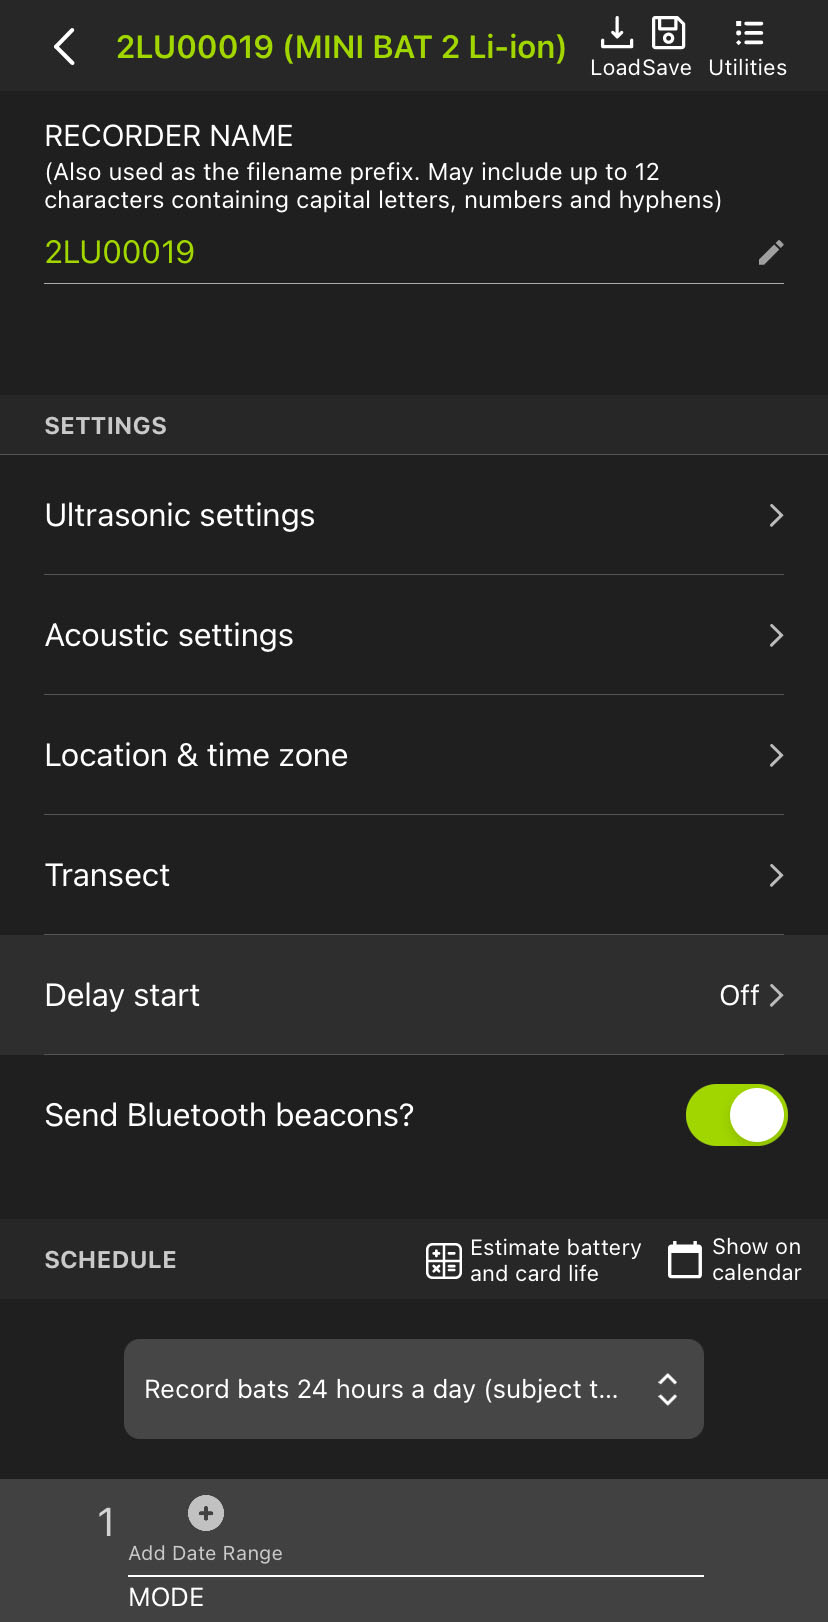 |
The Configuration Editor screen is the interface for editing all of the Song Meter Mini Bat 2's settings. When the Song Meter Configurator app is paired with a recorder, you can edit the recorder's settings directly, updating the recorder immediately with each setting change.
Alternatively, you can create a saved configuration in the Song Meter Configurator app's Configuration Library, and this configuration can be loaded onto multiple recorders, shared with a colleague, or saved for later use.
Whether you are directly editing the settings of a paired recorder or editing a configuration in the Configuration Library, the Configuration Editor interface is mostly identical, with only a few differences.
Note
This section only covers the interface elements that are specific to the Paired and Library Configuration Editor screens.
For a full description of each available setting, see Settings Reference.
For a full description of how the schedule system works, see Design a Custom Schedule.
 |
When you directly configure a paired recorder, the Configuration Editor has several unique features that are not available when editing a configuration in the Configuration Library.
Top-Most Info Bar
< (back), Recorder Name, and Recorder Model | This text displays the paired recorder's name and model. Tap on this text to return to the Recorders screen. |
Load | Tap to load a configuration from the app's Configuration Library, updating all of the paired recorder's settings to match. See Load a Configuration from the Configuration Library to a Paired Recorder for full instructions. |
Save | Tap to save a copy of the paired recorder's settings to the Configuration Library with a custom Configuration Name. See Save a Configuration File from a Paired Recorder to the Configuration Library for full instructions. |
Utilities | Tap to access various utility functions. See Utilities Menu for descriptions of all available utility functions. |
Recorder Name Panel
The RECORDER NAME displays the current recorder name as an editable text field. Tap on the recorder name or on the pencil icon to edit the recorder name. The default value of the RECORDER NAME is the recorder's serial number.
The RECORDER NAME is saved as the prefix of every audio file name for easy file organization. It is also saved to the metadata of each .wav audio file in the "WA|Song Meter|Prefix" field.
Transect
Tap to access the Transect Interface, which allows you to record location data alongside your recordings during a moving survey.
For a detailed description of what a transect is, how it works, and what information it produces, see Transect Mode.
For instructions on running a transect, see Record a Transect.
Send Bluetooth Beacons?
The Send Bluetooth Beacons? setting can only be edited directly on a paired recorder. See Send Bluetooth Beacons? for details on this setting.
 |
When you are editing a configuration saved in the Configuration Library, the top-most info bar of the Configuration Editor displays the following:
< (back), Configuration Name, and Recorder Model | Tap the < icon or any of the text displayed here to return to the Configuration Library. This text displays the name of the configuration currently being edited as well as the compatible recorder models for the configuration. A configuration can only be used of recorders of a single model, on both the first and second generations. |
Rename | Tap to open a Configuration Name window, where you can enter a new name for the saved configuration. |
The Transect screen is not accessible from within the Configuration Library, as running a transect requires keeping the Song Meter Configurator app paired with the Song Meter Mini Bat 2.
Note that the Send Bluetooth Beacons? setting cannot be edited from the Configuration Library. This setting can only be edited on a paired recorder. See Send Bluetooth Beacons? for details on this setting.
Utilities Menu
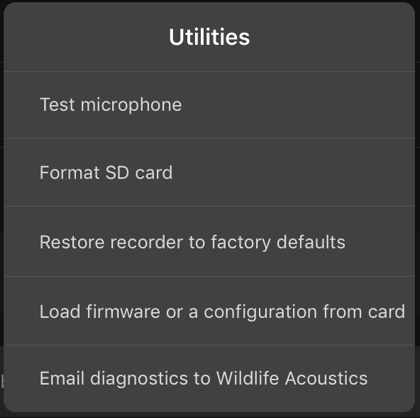 |
When configuring a paired Song Meter Mini Bat 2, the Utilities menu provides easy access to several useful functions.
To access the Utilities menu, tap the Utilities icon at the top right of the Configuration Editor screen when configuring a paired recorder.
The Utilities menu brings up the following utilities:
Test microphone | Tap to open an interface for testing the Song Meter Mini Bat 2's microphones with a reference signal generator. See Testing Microphone Sensitivity for detailed test instructions. |
Format SD card | Tap to format the Song Meter Mini Bat 2's SD card, erasing all contents and resetting the card to an initialized state. See Format the SD Card for instructions on multiple methods of formatting the SD card. |
Restore recorder to factory defaults | Tap to restore the Song Meter Mini Bat 2's default settings. See Restore Recorder to Factory Defaults for full instructions. |
Load firmware or a configuration from card | Tap to update the Song Meter Mini Bat 2's firmware or its settings from a file on its SD card. See Update the Recorder's Firmware for firmware update instructions. See Configuration Files on the SD Card for details on working with configuration files on the SD card. |
Email diagnostics to Wildlife Acoustics | Tap to generate a new email, addressed to the Wildlife Acoustics Support team, with a diagnostics file exported from the Song Meter Mini Bat 2. See Export Diagnostics Files for more information and alternative ways to export diagnostics files. |
Location & Time Zone Screen
The Song Meter Mini Bat 2 deployment location and time zone can be set in the Location & Time Zone screen, accessed from the Configuration Editor screen.
Location and time zone information are embedded in the metadata of files created by the Song Meter Mini Bat 2 recorder (see SD Card Contents).
The saved location settings must match the recorder's actual deployment location to within approximately 0.25 degrees if sunrise or sunset times are to be used in a recording schedule.
The time zone setting must match the time zone convention you want the recorder to follow. Note that in regions that practice daylight savings time, the time zone conventions are different for standard and daylight time.
Deployment location and time zone can be set automatically when the Song Meter Mini Bat 2 recorder is first paired with the Song Meter Configurator app (see Pair the Recorder with the Song Meter Configurator App).
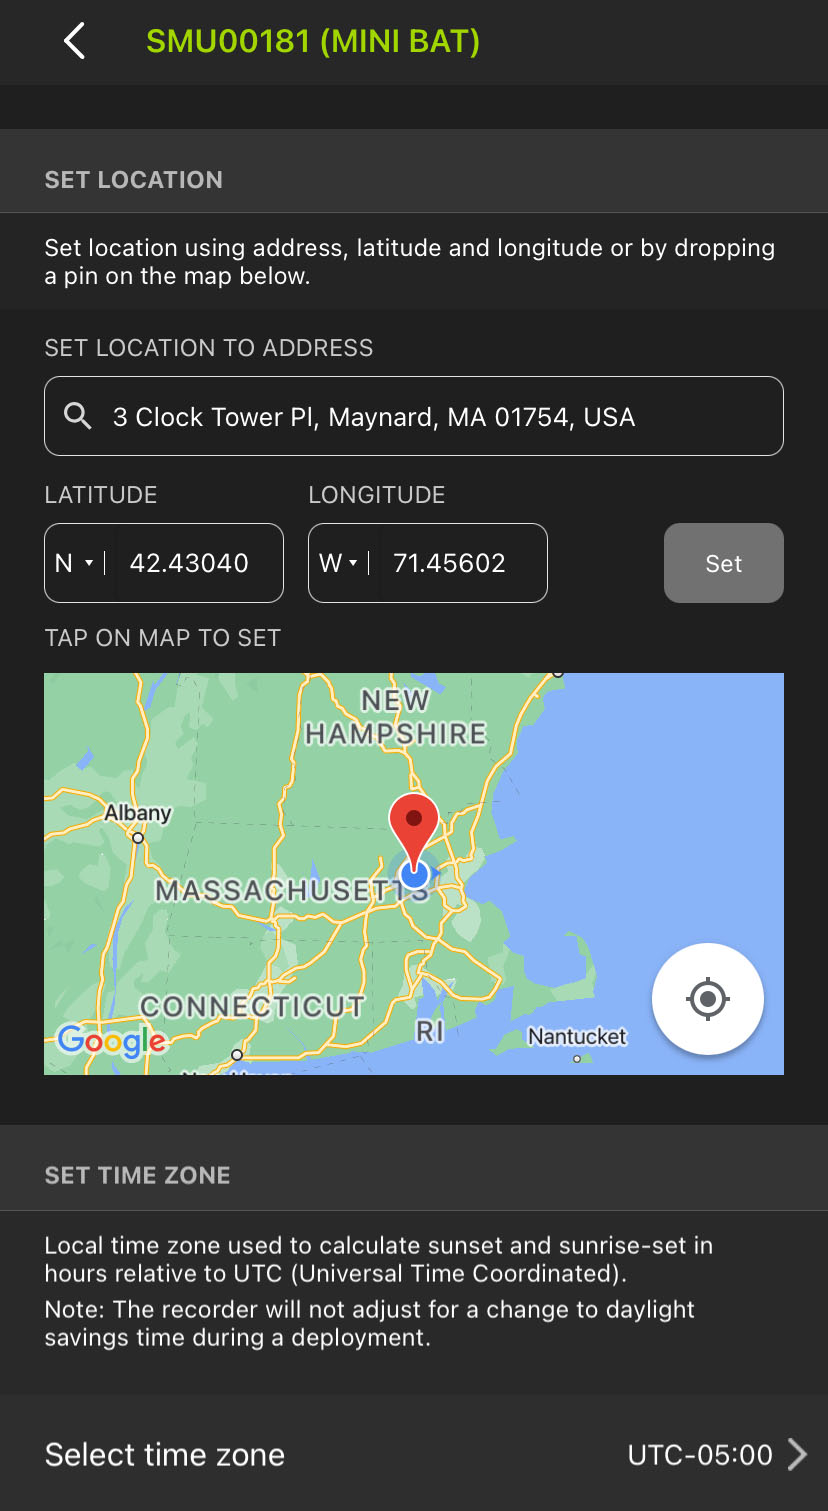 |
The Location & Time Zone screen can be accessed from the Configuration Editor either when configuring a paired recorder or when editing a configuration in the Configuration Library. In the Configuration Editor, under the SETTINGS heading, tap Location & time zone.
To exit the Location & Time Zone screen, tap the < (back) icon at the top-left corner of the screen.
If the mobile device is connected to the Internet, or if the nearby area is saved in Google MapsTM as an offline map, this panel will display an interactive map. The location saved to the paired Song Meter Mini Bat 2 or to the configuration is indicated by a red pin, and the mobile device's current location is indicated by a blue dot. A light-blue halo around the blue dot indicates the level of precision for the mobile device's detected location.
Note
Map data for specific regions can be saved to your mobile device for offline use using the Google MapsTM app. For full instructions, refer to this Google support article.
Note
Many tablets that do not have cellular connectivity also lack a built-in GPS antenna. Without a GPS antenna, a tablet can detect its approximate location from nearby Wi-Fi routers, but this data is not very precise, and it is only available when Wi-Fi routers are nearby.
A tablet paired with a dedicated GPS unit like the Garmin GLOTM 2 can access more precise location data.
The map on the Location & Time Zone screen is based on the Google MapsTM interface. Many gestures used for navigating the map mimic those used in the Google MapsTM app.
Touch and drag with one finger to pan across the map in any direction.
Double-tap with one finger to zoom in on the tapped location.
Pinch with two fingers to zoom in and out by spreading two fingers apart or bringing them together.
Tap once with one finger to save the tapped location as the deployment location, marked with a red pin.
Tap the Crosshairs icon to center the map view on your mobile device's location.
Transect Interface
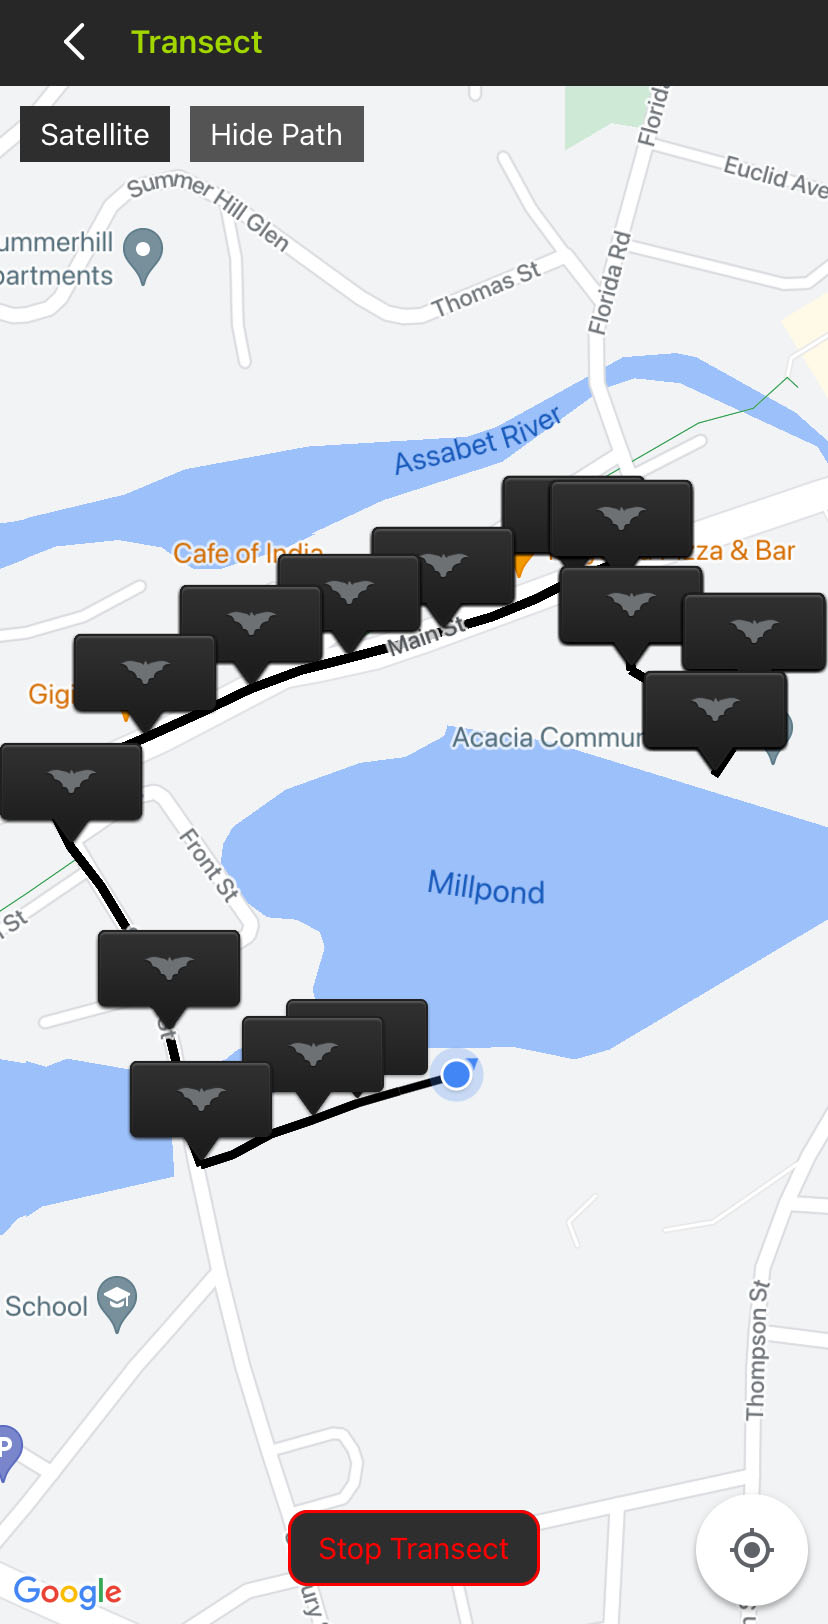 |
The Transect screen includes the following interface elements:
< Transect (back) icon | Tap to exit the Transect interface and return to the Configuration Editor. An active transect will continue running in the background. |
Satellite / Map | Tap to toggle the map interface between a simplified map view and one constructed from satellite imagery. |
Hide Path / Show Path | Tap to hide or show the path representing the mobile device's location, updated every five seconds. The path is saved to the KML file at the end of the transect even if it is kept hidden in the Transect view. |
Start Transect / Stop Transect | Tap to begin or end a transect. |
Crosshairs | Tap to center the map view on the mobile device's current location. |
The Transect screen's map view is based on the Google MapsTM interface. It supports the same touch gestures as Google MapsTM for navigating the map, including:
Touch and drag with one finger to pan across the map in any direction.
Double-tap with one finger to zoom in on the tapped location.
Pinch with two fingers to zoom in and out by spreading two fingers apart or bringing them together.
Schedule Editor Interface
The Schedule Editor occupies the lower half of the Configuration Editor Screen.
This section and the following subsections will describe the interface of the Schedule Editor and the basic functions of each element of the editing interface. For more information on how schedules work and how to design a custom schedule yourself, see Design a Custom Schedule.
 |
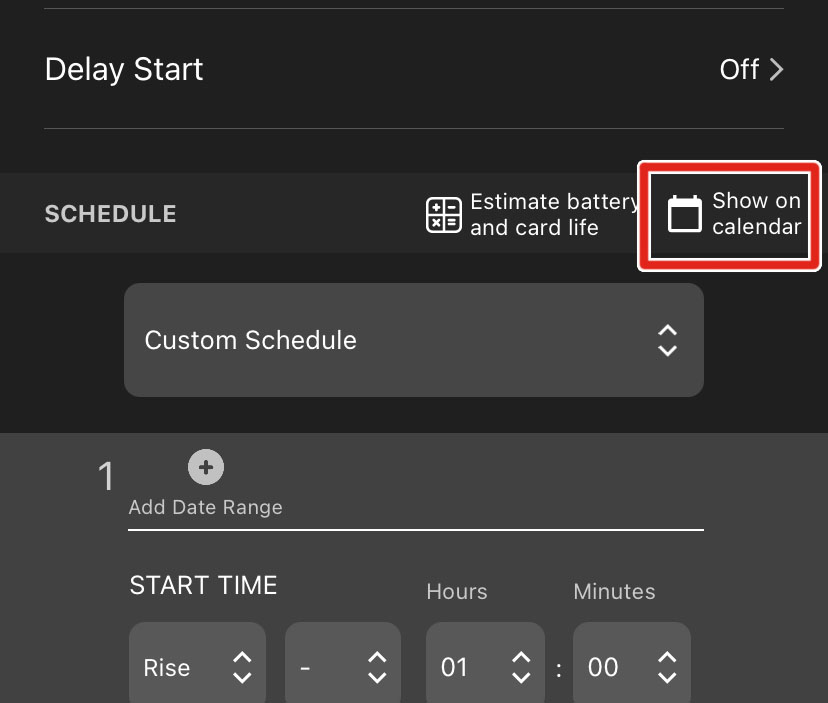
Schedule Editor: Upper Elements
Estimate battery and card life | Tap to open the Estimate Battery and Card Life Window. |
Show on Calendar | Tap to open the Schedule Calendar for the active schedule. |
Preset Schedules | Tap to select one of the Preset Schedules. Doing so will overwrite the existing schedule. |
Preset Schedules
The Song Meter Configurator app includes preset schedules for several common recording schedules. You can use these as-is, or you can them as a starting point for a custom schedule.[4]
Preset schedules for ultrasonic recording are:
Record bats 24 hours a day (subject to triggering).
Record bats from sunset to sunrise (subject to triggering).
Record bats 30 min before sunset to 30 min after sunrise (subject to triggering).
Preset schedules for acoustic recording (when the optional acoustic microphone is connected) are:
Record birds/frogs 24 hours a day
Record birds/frogs for 30 minutes of every hour.
Record birds/frogs for 5 minutes of every hour
Record birds/frogs from sunrise to sunset
Record birds/frogs 2 hours around sunrise and 2 hours around sunset.
Select a Preset Schedule
A preset schedule can be applied directly to a paired recorder or set as part of a configuration file.
Open the Configuration Editor to configure a paired recorder or edit a configuration file.
Under the SCHEDULE heading, tap the dropdown menu that displays the current schedule's name.
If the current schedule matches one of the preset schedules, that preset's name will be displayed. Otherwise, the name Custom Schedule is displayed.
In the dropdown menu, tap the desired schedule to select it, or tap outside of the menu to cancel any changes.
If configuring a paired recorder, selecting a preset schedule will immediately apply it to the recorder.
If editing a configuration file, the selected preset is immediately applied to the configuration file.
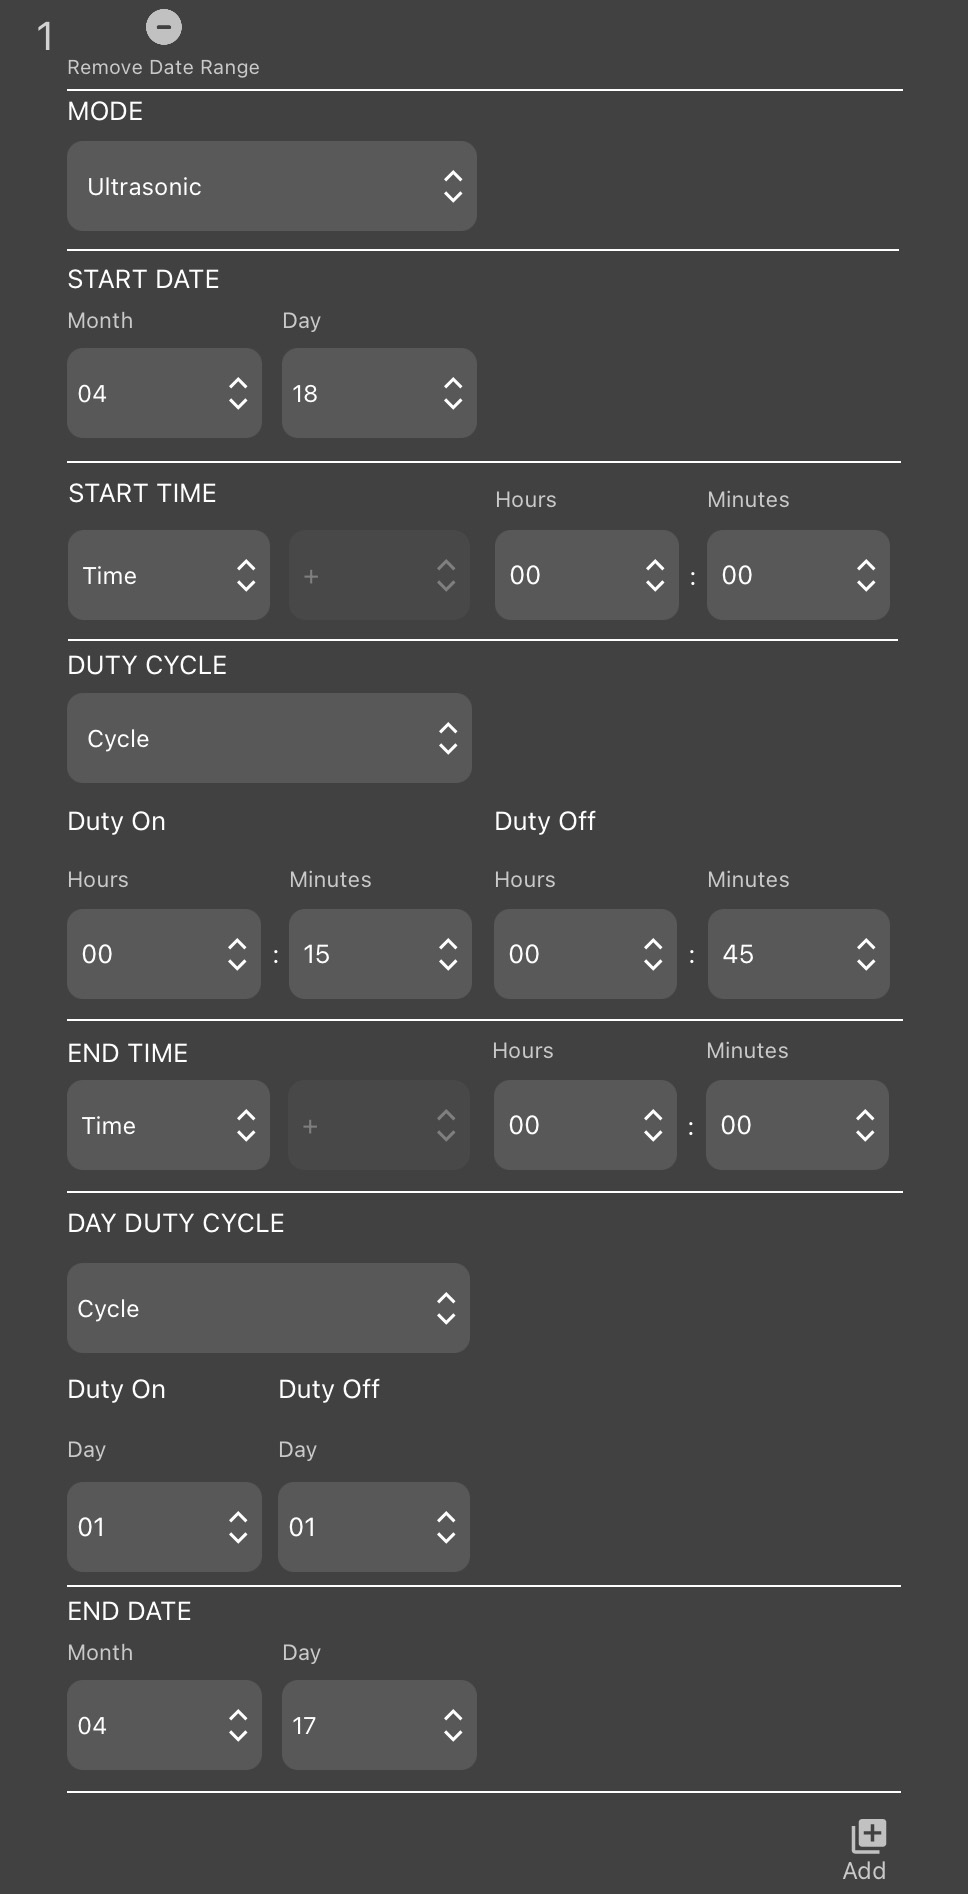
Schedule Block Elements
Each schedule can be composed of up to 10 schedule blocks, listed vertically below the Preset Schedules dropdown menu. Each schedule block includes the elements listed below. Note that the functions of these elements and how they can be used are described in much greater detail in Design a Custom Schedule.
Add Date Range / Remove Date Range | Tap to add or remove the START DATE, DAY DUTY CYCLE, and END DATE features from the schedule block. When these features are disabled, the schedule block will run each day. |
MODE | If the Song Meter Mini Bat 2 has the optional acoustic microphone installed, this menu selects whether the schedule block activates ultrasonic or acoustic recording. |
START DATE: Month and Day | When Date Range is active, these dropdowns determine the date when the schedule block begins running. |
These controls determine when, during a 24-hour period, the schedule block starts running.
Time / Rise / Set | When Time is selected, the schedule block will start at a fixed time on the clock each day. When Rise or Set is selected, the schedule block will start at a fixed offset relative to sunrise or sunset, respectively. |
+ / - | Not active when Time is selected. When Rise or Set is selected:
|
Hours and Minutes | When Time is selected, these dropdowns define the fixed time when the schedule block begins running, using the 24-hour clock system. When Rise or Set is selected, these dropdowns define the length of the offset before or after sunrise or sunset. |
Always / Cycle | Tap to select whether the schedule block runs continuously between its start and end times or follows a duty cycle. |
Duty On: Hours and Minutes | When Cycle is selected, these dropdowns define the length of the active portion of the duty cycle. |
Duty Off: Hours and Minutes | When Cycle is selected, these dropdowns define the length of the inactive portion of the duty cycle. |
These controls determine when, during a 24-hour period, the schedule block stops running.
Time / Rise / Set | When Time is selected, the schedule block will end at a fixed time on the clock each day. When Rise or Set is selected, the schedule block will end at a fixed offset relative to sunrise or sunset, respectively. |
+ / - | Not active when Time is selected. When Rise or Set is selected:
|
Hours and Minutes | When Time is selected, these dropdowns define the fixed time when the schedule block stops running, using the 24-hour clock system. When Rise or Set is selected, these dropdowns define the length of the offset before or after sunrise or sunset. |
These controls are only visible when a Date Range is enabled for a given schedule block.
Always / Cycle | Tap to select whether the schedule block runs every day between the START DATE and END DATE or whether it follows a duty cycle to determine on which days to run. |
Duty On: Days | When Cycle is selected, this determines the length, in days, of the active portion DAY DUTY CYCLE. |
Duty Off | When Cycle is selected, this determines the length, in days, of the inactive portion DAY DUTY CYCLE. |
END DATE: Month and Day | When Date Range is active, these dropdowns determine the date when the schedule block stops running. |
Add | Located at the bottom-right of the bottom-most schedule block. Tap to insert a new block into the schedule, up to a maximum of ten. |
Delete | Located at the bottom-right of each schedule block, provided more than one block is present. Tap to remove the block from the schedule, down to a minimum of one. |
Schedule Calendar
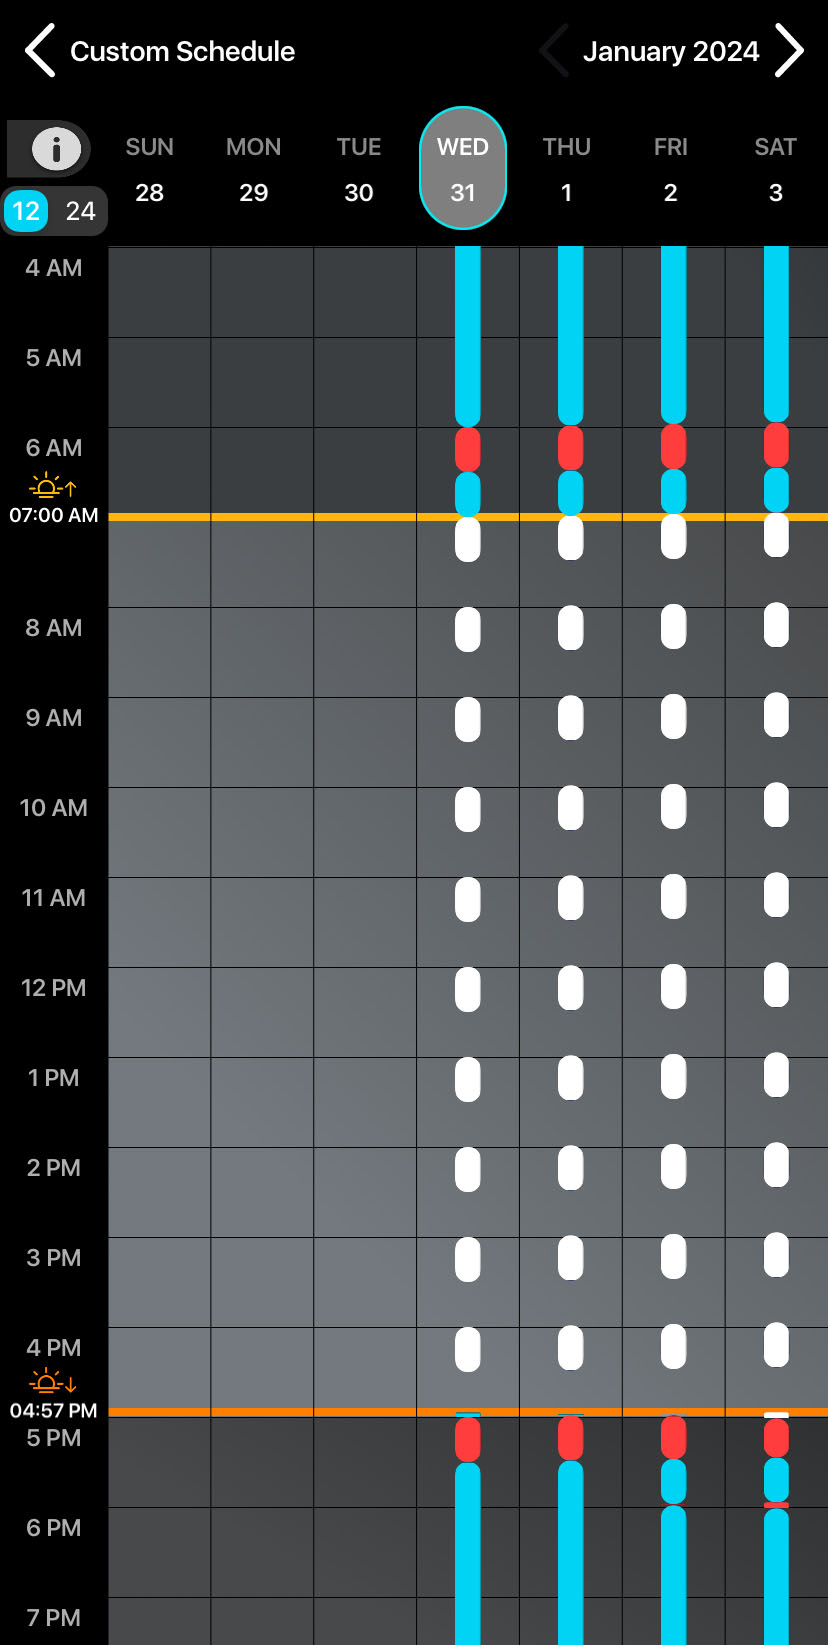 |
The Schedule Calendar provides a visual representation of your recording schedule. It shows when your recorder will be active during any given day. This is especially useful for complex schedules comprised of multiple schedule blocks. By looking at the Schedule Calendar, you can:
Confirm that the schedule shown on the calendar matches your intended schedule.
Check whether any recording periods from multiple blocks overlap with each other.
Find any conflicts between ultrasonic and acoustic recording periods.
See how changes in sunrise and sunset during the course of a deployment will affect your schedule.
Confirm that schedule blocks with date ranges or day duty cycles are active on the expected dates.
To learn more about recording periods and how to construct a recording schedule, see Design a Custom Schedule.
To access the Schedule Calendar from the Configuration Editor screen, tap Show on calendar.
 |
There are two methods to exit the Schedule Calendar:
Tap the < icon or the Schedule Name in the top-left corner of the screen.
Touch the left edge of the screen with one finger and swipe right.
The calendar displays one week of dates at a time, from Sunday to Saturday, arranged horizontally. The currently displayed dates are listed across the top of the calendar panel. A single Selected Date is highlighted in light gray with a blue border. The Month and Year of the Selected Date are displayed in the upper right of the calendar screen.
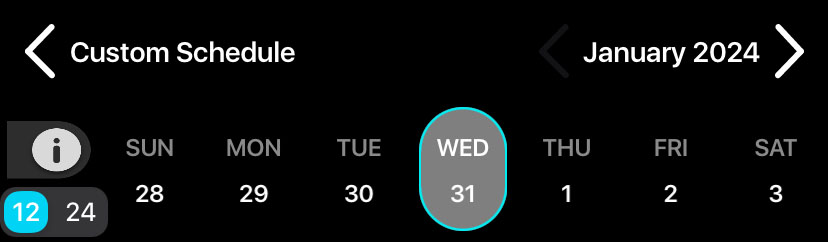 |
To navigate between months, tap the < and > buttons on either side of the Month and Year text.
To navigate between weeks, use one finger to touch anywhere in the main panel of the calendar and swipe left or right.
To change the Selected Date, tap on the day name or date number of the desired date above the calendar's main panel. The Selected Date determines the values of sunrise and sunset times displayed in the calendar (see Sunrise and Sunset Times).
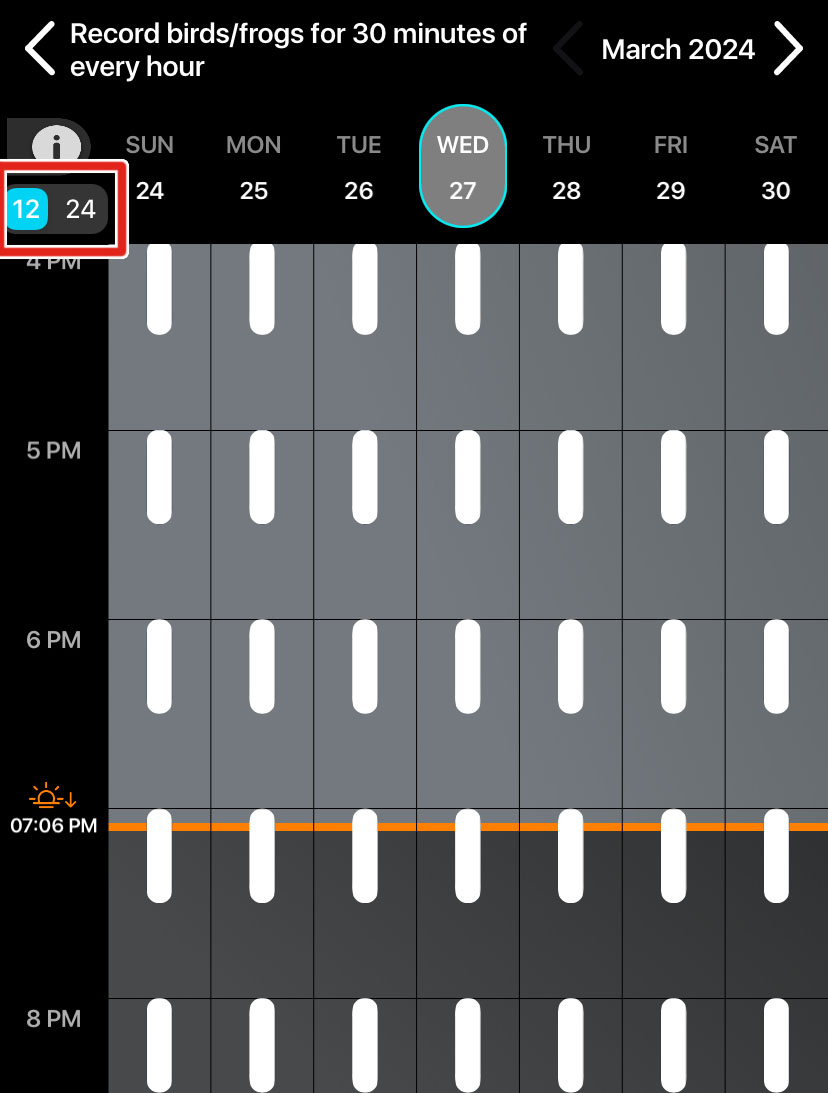
Time of day is visually segmented into one-hour blocks in the calendar's main panel. Each block is labeled by hour in the vertical axis to the left of the calendar's main panel.
To scroll through time of day, use one finger to touch the main calendar panel and drag up or down.
To adjust the vertical zoom level, touch the calendar panel with two fingers, arranged vertically, and move your fingers together or away from each other.
To change whether the time labels on the vertical axis use 12-hour or 24-hour clock conventions, tap the 12/24 toggle switch above the time axis.

12-hour convention (left) and 24-hour convention (right).
The Schedule Calendar displays calculated sunrise and sunset times for the Selected Date along the vertical axis. Sunrise is indicated by a yellow line and a  icon. Sunset is indicated by an orange line and a
  icon.
icon.
While the lines indicating sunrise and sunset are drawn across the entire displayed week, the precisely calculated times are based only on the Selected Date (see Navigate and Select Dates).
Note
Sunrise and sunset are calculated for each date based on the recorder’s saved deployment location and time zone. If the sunrise and sunset times shown on the calendar for the current date do not match reality, check the Location & Time Zone Screen to confirm the following:
The saved location is accurate to within 0.250 degrees latitude and longitude.
The saved time zone matches your current local time zone.
Note that the Song Meter Mini Bat 2 will not adjust for changes between Daylight and Standard time without pairing with the Song Meter Configurator app.
Recording periods are shown on the calendar as rounded rectangles of various colors:
White: acoustic.
Blue: ultrasonic.
Red: conflict between acoustic and ultrasonic periods.
To view a legend that shows what each color means in the Schedule Calendar, tap the  icon to the upper left of the main calendar panel.
Recording periods of the same type that overlap with each other are shown as a single, combined recording period. This reflects that the Song Meter Mini Bat 2 combines overlapping recording periods into one, longer recording period.
Intervals when acoustic and ultrasonic recording periods overlap with each other are shown in red. The Song Meter Mini Bat 2 can only use one recording mode at a time. During these conflicts, the recorder will record in acoustic mode.
Configuration Library Screen
The Configuration Library screen can be accessed by tapping the Configuration Library icon at the bottom center of the Recorders screen or App Info screen.
The Configuration Library allows you to store, edit, and share configuration files. Configuration files store a nearly full collection of settings for a Song Meter Mini Bat 2. Configuration files provide a way to consistently apply the same settings to multiple recorders or across multiple deployments. See Manage Configuration Files for more information.[5]
Configuration Library Interface
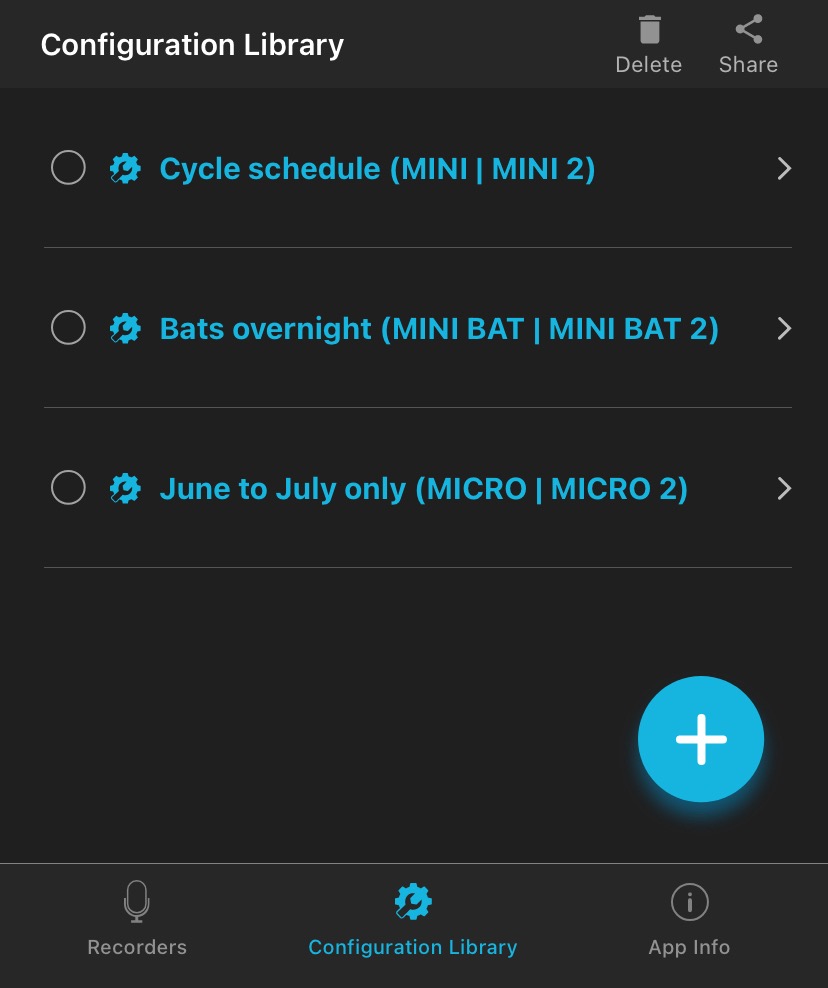 |
The top-most info bar on the Configuration Library screen includes two buttons:
Delete | After selecting one or multiple configurations from the list, tap this button to delete them. See Delete a Saved Configuration File. |
Share | After selecting one or multiple configurations from the list, tap this button to share the configuration file using another app on your device. See Share a Saved Configuration File. |
The entry for each configuration includes the following elements:
Selection bubble | Tap this bubble, on the left side of each list entry, to select the configuration for deletion or sharing. You can select multiple configurations at once. |
Configuration name and model | This text displays the name for each configuration as well as the Song Meter models with which it can be used. Tap on this text to edit the configuration. See Edit a Saved Configuration File |
In the bottom-right corner of the Configuration Library window is one additional button:
+ (Add Configuration) | Tap this icon to create a new configuration from scratch. See Create a Configuration File in the Configuration Library Screen. |
Below the interface for the Configuration Library itself are buttons for accessing the Recorders Screen and App Information Screen.
App Information Screen
 |
The App Information screen is accessed by tapping the App Info button at the bottom right of the Recorders or Configuration Library screens. It contains:
Information about the current version of the app.
Links to user guides, tutorial videos, and frequently asked questions for Wildlife Acoustics recorders.
Language settings for the Song Meter Configurator app.
Contact info for Wildlife Acoustics.
Information about other Wildlife Acoustics products.
App Version Number and Release Notes
The current version of the Song Meter Configurator app is listed. Tapping this entry opens a screen with release notes for the installed app version.
User Guides, Tutorial Videos, and Frequently Asked Questions
User guides for all versions of the Song Meter Mini and Song Meter Micro families of recorders can be accessed from within the app. These user guides are included in the app installation and can therefore be accessed without an internet connection.
The entries for Tutorial Videos and Frequently Asked Questions will open a web browser window on your device to show the corresponding pages on our website. See Video Tutorials and Frequently Asked Questions.
Viewing these pages requires an internet connection.
App and Guide Language
Tap this item to change the language used by the Song Meter Configurator app and built-in user guides. By default, the app will use the language system setting of the iOS or Android device if a translation exists for that language. A manual selection from this menu will override the default setting.
The Song Meter Configurator app is available in the following languages:
English
French
Spanish
Portuguese
Chinese
German
Japanese
Other Links
- Contact Us
Tap this item to generate a blank email addressed to Wildlife Acoustics Support,
support2024@wildlifeacoustics.com. Sending an email requires an active internet connection.You can also contact Wildlife Acoustics Support through the Support Contact Form on our website at wildlifeacoustics.com/support.
- Join Our Mailing List
Opens your web browser to a page where you can join our Email List. Join our email list to get notified about upcoming training opportunities, important technical service bulletins, webinars, our quarterly grant program, and product updates.
- Echo Meter Touch 2 Bat Detector
Opens your web browser to the product page for the Echo Meter Touch 2, a device that allows you to hear and record bat echolocations in real-time using your smartphone or tablet. (Compatible with Android and iOS devices that have a USB-C port. Available in two versions: PRO and Standard.)
- Kaleidoscope Pro Sound Analysis Software
Opens your web browser to the product page for Kaleidoscope Pro, our desktop audio analysis software.
- About Wildlife Acoustics, Inc.
Displays a short info page about us.
[4] See Design a Custom Schedule for details on how the schedule system works and how to make modifications to a schedule.
[5] The Recorder Name and Send Bluetooth Beacons? settings cannot be set using a configuration file. To alter these settings, you must Configure a Paired Recorder Directly.