5. Configuring the Song Meter Micro 2
Set the Recorder's Clock, Deployment Location, and Time Zone
Automatically Set the Recorder’s Clock
The first time the Song Meter Micro 2 recorder is configured, or if the batteries have been removed for some time, the internal clock will not be set. When the recorder is paired with the Song Meter Configurator app, the clock of the recorder will be automatically set to match the mobile device. See Pair the Recorder with the Song Meter Configurator App for pairing instructions.
Automatically Set the Recorder's Time Zone
You can set the time zone setting of the Song Meter Micro 2 automatically when pairing with the recorder.
During pairing, if the recorder's current time zone setting does not match the time zone setting on your mobile device, the app will ask if you want to update the recorder's time zone. In most circumstances, we recommend tapping YES to match the recorder's time zone with your mobile device's time zone. See Pair the Recorder with the Song Meter Configurator App for pairing instructions.
If you are configuring the recorder in a different time zone than where the recorder will be deployed, you should either configure the recorder's time zone manually (see Manually Set the Recorder's Time Zone) or pair with the recorder when you reach the deployment site to update its time zone.
Automatically Set the Recorder’s Deployment Location
The Song Meter Micro 2 can save one set of latitude and longitude coordinates at a time. This saved location is used to calculate the times of sunset and sunrise each day, and it is also saved as metadata to each recording file and to the recorder's summary text file. This provides a record of where each audio file originated.
When the Song Meter Micro 2 recorder is pairing with the Song Meter Configurator app, the current location of the mobile device is compared with the recorder. See Pair the Recorder with the Song Meter Configurator App for pairing instructions.
If the saved location on the recorder does not match the current location of the mobile device, the following message will be displayed:
 |
Tap YES to set the programmed location of the Song Meter Micro 2 recorder to the current mobile device location.
Tap NO to leave the currently programmed location of the recorder unchanged.
If you are configuring the recorder in a different location than where it will be deployed, you should either configure the recorder's deployment location manually (see Manually Set the Recorder's Deployment Location) or pair with the recorder when you reach the deployment site to update its saved location.
Manually Set the Recorder's Deployment Location
When you Pair the Recorder with the Song Meter Configurator App, the app will prompt you to update the Song Meter Micro 2's deployment location setting if it does not match your mobile device's current location.
If you instead want to manually set the recorder's deployment location either by directly configuring a paired recorder or by creating a configuration file, you can do so in the Location & Time Zone Screen.
The Song Meter Micro 2's saved location can be set using a street address, based on the location saved for that address in the Google MapsTM database.
Open the Location & time zone screen in the Song Meter Configurator app:
Open the Configuration Editor.
To configure a paired recorder directly, see Configure a Paired Recorder Directly.
To configure a saved configuration file, see Edit a Saved Configuration File.
Tap Location & time zone to open the Location & Time Zone Screen.
Use the search field labeled Set Location to Address to search for and select a street address.
The address window will close, the Latitude and Longitude fields will reflect the address's location, and the map view will show the saved location marked with a red pin.
Select Save to confirm the new location.
If you are configuring a paired recorder, its LEDs will flash green to signal the settings change.
You can manually specify coordinates to use for the recorder's saved location. Under the Latitude and Longitude headings, coordinates are specified using a hemisphere prefix and a numeric value. Positive and negative signs are not used to indicate hemisphere. Instead, N and S are used to specify northern and southern latitudes, and E and W are used to specify eastern and western longitudes.
Open the Location & time zone screen in the Song Meter Configurator app:
Open the Configuration Editor.
To configure a paired recorder directly, see Configure a Paired Recorder Directly.
To configure a saved configuration file, see Edit a Saved Configuration File.
Tap Location & time zone to open the Location & Time Zone Screen.
Set Latitude hemisphere and value:
Under Latitude, tap the N or S to open a dropdown menu. Select N for latitudes north of the equator, and select S for latitudes south of the equator.
Tap on the text field under Latitude, and use the onscreen numeric keypad to edit the latitude value.
The red pin on the map will mark the new location.
Set Longitude hemisphere and value:
Under Longitude, tap the E or W to open a dropdown menu. Select E for longitudes east of the prime meridian, and select W for longitudes west of the prime meridian.
Tap on the text field under Longitude, and use the onscreen numeric keypad to edit the longitude value.
The red pin on the map will mark the new location.
Select Save to confirm the new location.
If you are configuring a paired recorder, its LEDs will flash green to signal the settings change.
Open the Location & time zone screen in the Song Meter Configurator app:
Open the Configuration Editor.
To configure a paired recorder directly, see Configure a Paired Recorder Directly.
To configure a saved configuration file, see Edit a Saved Configuration File.
Tap Location & time zone to open the Location & Time Zone Screen.
Tap the map with one finger to update the saved location.
A red pin on the map will indicate the new location.
Select Save to confirm the new location.
If you are configuring a paired recorder, its LEDs will flash green to signal the settings change.
Manually Set the Recorder's Time Zone
When you Pair the Recorder with the Song Meter Configurator App, the app will prompt you to update the Song Meter Micro 2's time zone setting if it does not match your mobile device's time zone.
If you instead want to manually set the recorder's time zone either by directly configuring a paired recorder or by configuring a time zone in a configuration file, you can do so in the Location & Time Zone Screen.
Open the Location & time zone screen in the Song Meter Configurator app:
Open the Configuration Editor.
To configure a paired recorder directly, see Configure a Paired Recorder Directly.
To configure a saved configuration file, see Edit a Saved Configuration File.
Tap Location & time zone to open the Location & Time Zone Screen.
Tap Select time zone.
A pop-up window appears with a display of your MOBILE DEVICE'S TIMEZONE and a dropdown menu for selecting a manual time zone.
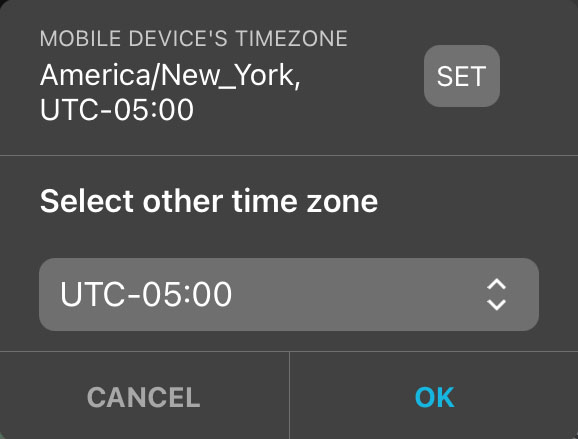
Select a time zone using either of these methods:
Tap SET to update the saved time zone setting to match your mobile device's current time zone.
Tap the dropdown menu labeled Select other time zone to manually set the time zone.
Tap OK to confirm the time zone change and dismiss the pop-up window.
Configure the Recorder's Settings
There are two ways to configure the settings on the Song Meter Micro 2:
You can pair with a recorder and configure its settings directly. Using this method, every settings change is immediately applied to the paired recorder.
You can also prepare a configuration file in advance, then load it to apply all of the configuration file's settings to a recorder at once. This is particularly helpful for maintaining consistent settings across multiple recorders or multiple deployments.
Configuration files can be loaded from the Configuration Library section of the Song Meter Configurator app or from an SD card installed in the Song Meter Micro 2.
Configure a Paired Recorder Directly
When the Song Meter Micro 2 recorder pairs with the Song Meter Configurator app, the Paired Configuration Editor automatically displays the recorder's current settings. Any changes you make in the Configuration Editor are immediately saved to the paired recorder. The LEDs on the paired recorder will flash green three times each time a setting is changed.
To view and alter the schedule and settings of a paired recorder:
In the Song Meter Configurator app, open the Recorders screen.
Pair the Recorder with the Song Meter Configurator App.
Configure and Unpair icons will appear next to the recorder's name.
Tap the Configure icon to open the Configuration Editor.
In any part of the Configuration Editor or its sub-pages, change a setting.
See Settings Reference for detailed descriptions of all available settings.
The LEDs on the Song Meter Micro 2 flash green three times, indicating that the setting has been updated and applied to the recorder.
Making a configuration change stops any recording in progress and pauses the schedule for ten seconds. This allows changes to be made to the configuration without constantly starting and stopping a record schedule. Each configuration change resets the ten-second pause.
Ten seconds after no further changes have been made, the recorder will resume its schedule, which may mean that it starts recording again if scheduled to do so.
Rename a Recorder
Each Song Meter Micro 2 can be assigned a name. This name identifies the recorder in the Recorders screen, and it is also added as a prefix to the name of each audio recording, summary file, and diagnostics file the recorder saves to its SD card. See File Name Conventions.
By default, the recorder's name matches its serial number, printed on the side of the enclosure. You can assign a custom name to serve as a quick reminder of where the files were recorded or the project they were associated with. This can be helpful for keeping your files organized during analysis.
Pair the Recorder with the Song Meter Configurator App.
Configure and Unpair icons will appear next to the recorder's name.
Tap the Configure icon for the paired Song Meter Micro 2 in the Recorders screen.
Under the RECORDER NAME heading, tap the text field displaying the recorder's current name.
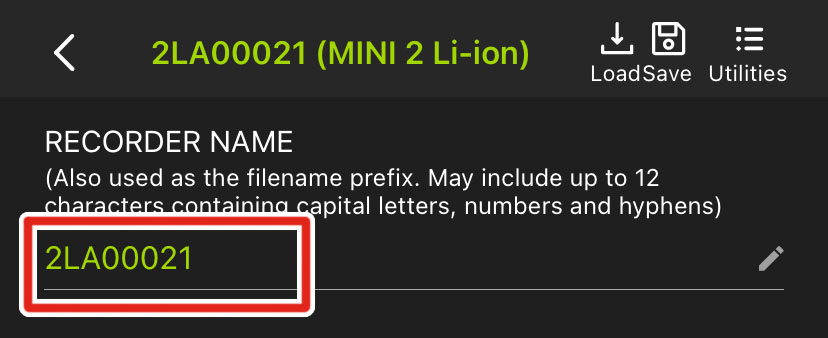
Edit the text field.
Tap Return, or tap outside of the keyboard interface.
The edited recorder name is immediately saved.
All LEDs will flash green to confirm the setting change.
Recorder Name Requirements
Recorder names must be 12 or fewer characters. Valid characters include:
Capital, unaccented, Roman letters
Numbers
Hyphens
Underscores[3]
Configure a Recorder Using a Configuration File
This section describes how to configure a Song Meter Micro 2's settings using a configuration file. Configuration files can be used to configure multiple recorders with a particular set of settings. They can be loaded onto a recorder from the Song Meter Configurator app's Configuration Library or from an SD card installed in the recorder.
Configuration files are described in more detail in Manage Configuration Files. That section includes instructions on creating, editing, and sharing configuration files.
Load a Configuration from the Configuration Library to a Paired Recorder
Loading a configuration file sets all of the paired recorder's settings to match how the settings were set in the configuration file. This is useful if you want multiple recorders to use identical settings, or if you want to maintain consistent settings from one deployment to the next. A single configuration file can be used repeatedly, on multiple Song Meter Micro or Song Meter Micro 2 recorders.
The following procedure loads a saved configuration file from the Configuration Library to a paired recorder using the Song Meter Configurator app.
Make sure the configuration file you want to load is saved in the Configuration Library.
See Configuration Library Screen for methods on creating or importing a configuration file into the app.
Tap the Configure icon to open the recorder's Configuration Editor screen.
Tap the Load icon at the top of the Configuration Editor screen.
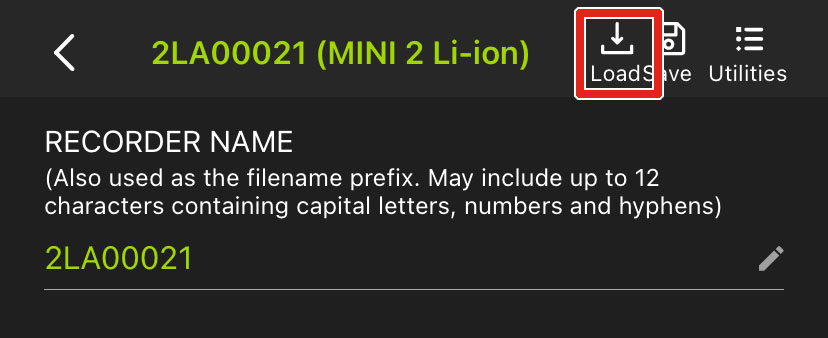
A Load Configuration window will appear.
Select your configuration file from the Load Configuration window.
A dialog window will ask if you are sure you want to load the selected configuration.
Tap OK.
A Success window will display a message confirming the configuration has been loaded.
All of the Song Meter Micro 2's will flash green to indicate the configuration has been loaded.
Load a Configuration File from an SD Card
A configuration file can be loaded from an SD card to configure all of a Song Meter Micro 2's settings.
The configuration file must be saved to the top-level of an SD card, also called the "root." This means that the file is not located inside a subfolder on the SD card. When you export a configuration file from a recorder to its SD card, the configuration file is automatically saved to the top-level of the card.
Load a Configuration to a Paired Recorder from an SD Card
This is one of multiple ways to apply a configuration file to a Song Meter Micro 2, updating all of the recorder's settings to match the configuration file. For a full list of methods for programming a recorder's settings, see Configure the Recorder's Settings.
This procedure loads a configuration file (ending in .miniconfig) and/or firmware file (ending in .smm), from the SD card to the recorder. If there are both a configuration file and firmware file on the card, the configuration file will be loaded first, and then the firmware update will be loaded.
After the configuration file has been loaded and the Song Meter Micro 2's settings are configured, it is no longer necessary to keep the configuration file on the SD card.
Save a configuration file to the top-level of an SD card.
There must be only one configuration file on the card.
See Manage Configuration Files for instructions on saving configuration files directly from a Song Meter Micro 2 or by using a computer.
Insert the SD card into the Song Meter Micro 2.
Install brand-new or freshly charged batteries into the Song Meter Micro 2.
Partially drained batteries can cause the load process to fail.
In the Song Meter Configurator app, open the Utilities menu:
Pair the Recorder with the Song Meter Configurator App.
Configure and Unpair icons will appear next to the recorder's name.
Tap the Configure icon for the paired Song Meter Micro 2 in the Recorders screen.
Tap the Utilities icon in the upper-right corner of the Configuration Editor.
In the Utilities menu, tap Load firmware or a configuration from card.
A message appears to remind you to have fresh batteries installed in the recorder and to not interrupt the load process.
Tap PROCEED to load the configuration file.
An Updating indicator appears, followed by the message Load successful.
Tap OK to dismiss the message.
The settings shown in the Configuration Editor for the paired recorder should now match the settings saved in the configuration file.
Manage Configuration Files
This section covers what configuration files are and how to use them.
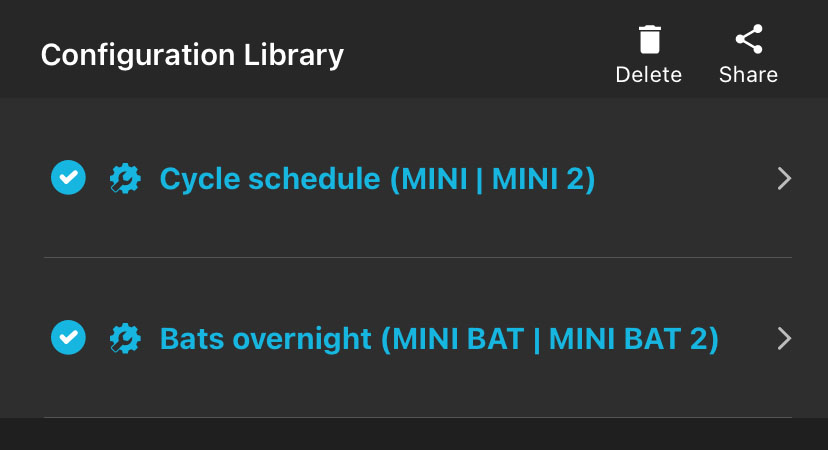
Configuration Files in the Configuration Library
The Song Meter Configurator app's Configuration Library allows you to save as many configuration files as you want, for multiple recorder models.
Configuration files can be added to the Configuration Library screen by three methods:
To create a new configuration starting from the Configuration Library screen, see Create a Configuration File in the Configuration Library Screen.
To save the settings from a paired recorder to a configuration file, see Save a Configuration File from a Paired Recorder to the Configuration Library.
To import a configuration file from another app, such as an email or cloud storage app, see Import a Configuration File from Another App.
Saved configuration files can be edited and deleted in the Configuration Library.
To edit a configuration file in the Configuration Library, see Edit a Saved Configuration File.
To delete a configuration file from the Configuration Library, see Delete a Saved Configuration File.
Configuration files can be exported from the Configuration Library screen and sent to someone else with the Song Meter Configurator app installed, allowing multiple people to program recorders with matching settings.
To export a configuration file from the Configuration Library to another app (to send to another person or a different device, for example), see Share a Saved Configuration File.
To import a configuration file from an outside source to the Configuration Library, see Import a Configuration File from Another App.
Create a Configuration File in the Configuration Library Screen
Navigate to the Configuration Library screen.
Tap the + icon to open the Add configuration screen.
Choose which Song Meter model the configuration is intended for.
Tap on the CONFIGURATION NAME text field to enter a custom name.
Choose a PRESET SCHEDULE from the dropdown menu to use as a starting point.
The schedule can be changed on the next screen.
Choose whether to Use Mobile Device Location or not.
If this option is disabled, fields will appear to manually enter coordinates or an address or to tap a location on a map.
Choose whether to Use Mobile Device Time Zone or not.
If this option is disabled, a menu item will appear to select a Time Zone from a dropdown list.
Tap NEXT.
The Configuration Editor will open.
Adjust the Settings and Schedule as necessary (see Configuration Editor Screen).
When you are done making changes to the configuration, tap the configuration's name at the top of the screen.
The app will return to the Configuration Library screen, and the configuration file you just created will be present in the list of configurations.
Save a Configuration File from a Paired Recorder to the Configuration Library
Saving a configuration file copies all of the paired recorder's settings into a configuration file, which is saved to the Song Meter Configurator app's Configuration Library. This configuration file can be loaded into the same recorder or another of the same model to restore those saved settings. This is useful for duplicating settings across multiple recorders, and it is also a way to back up your settings before you experiment with changes to how a recorder is configured.
The following procedure uses the Song Meter Configurator app to save a configuration file from a paired recorder to the app's Configuration Library.
Tap the Configure icon to open the recorder's Configuration Editor screen.
Tap the Save icon at the top of the Configuration Editor screen.
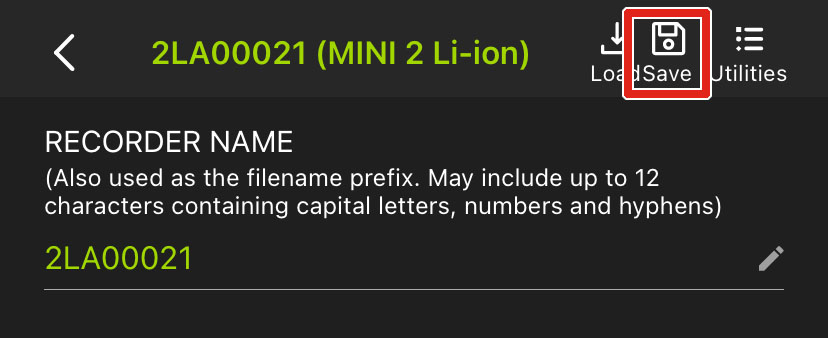
A Configuration Name window appears. An editable text box is prepopulated with the paired recorder's Recorder Name.
Edit the text field to set a name for your configuration.
Tap OK.
Your configuration will be saved.
To view your configuration file,
Exit the Configuration Editor by tapping the < button at the top left of the screen.
Tap the Configuration Library button at the bottom of the Recorders screen.
Your configuration will be listed in the Configuration Library screen.
To make further changes to the saved configuration, see Edit a Saved Configuration File.
Import a Configuration File from Another App
Configuration files can be imported from other apps on your mobile device into the Configuration Library of the Song Meter Configurator app. Once stored in the Configuration Library, saved configurations can be used to update a recorder's settings.
For more information on the Configuration Library and configuration files, see Configuration Library Screen.
If a .miniconfig file is sent to you as an email attachment, you can import the file into the Song Meter Configurator's Configuration Library. Importing files sent via other means, such as a message app, a cloud storage app, or Apple AirDrop, works via a similar series of steps.
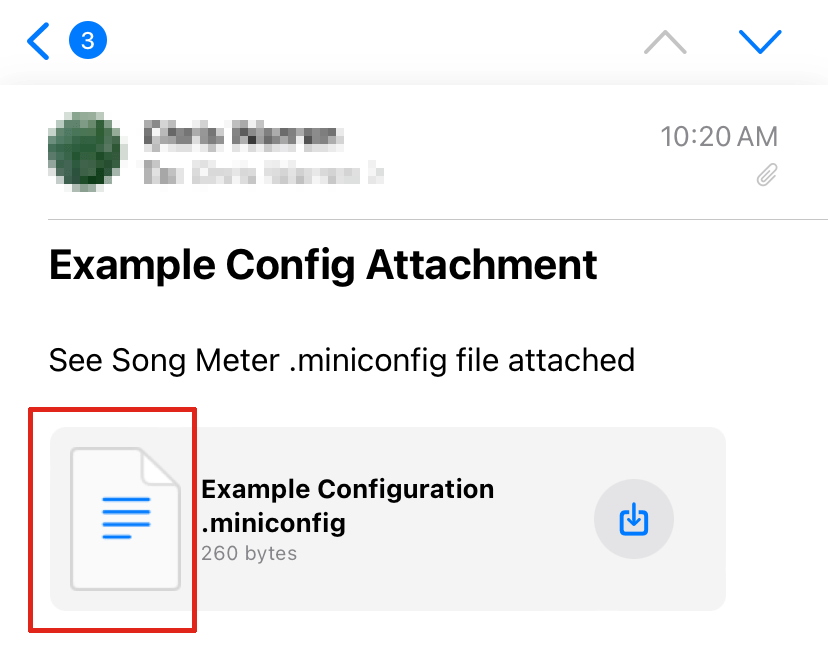
Open the iOS Mail app.
Open the message containing the
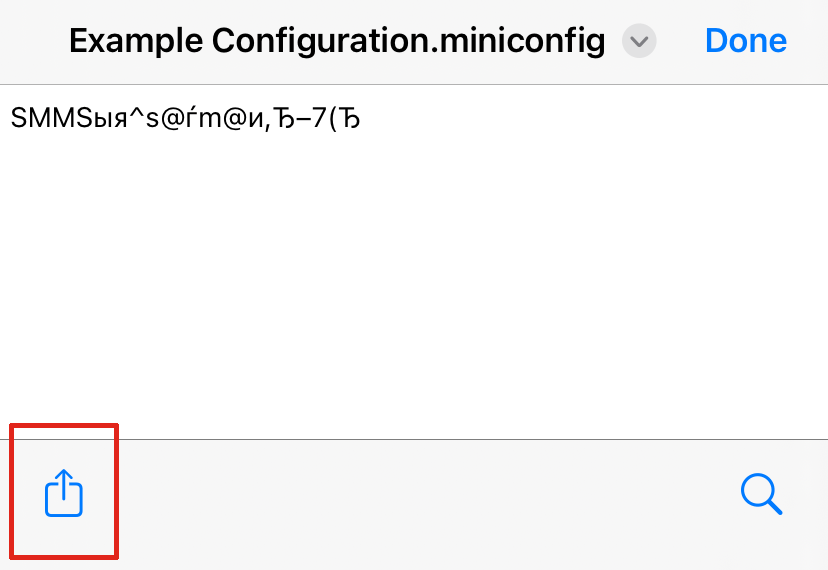
.miniconfigfile attachment.Tap on the attachment to open a preview window. Do not tap on the Download icon, shown as a square with a downward arrow.
Because the iOS Mail app cannot interpret a
.miniconfigfile, the body of the preview window will display a short string of nonsensical text.Tap on the Share icon, shown as a square with an upwards arrow.
This opens the iOS interface for sharing files between apps.
If the Song Meter app is not shown in the list of apps in the sharing interface, tap the More icon at the far-right end of the list.
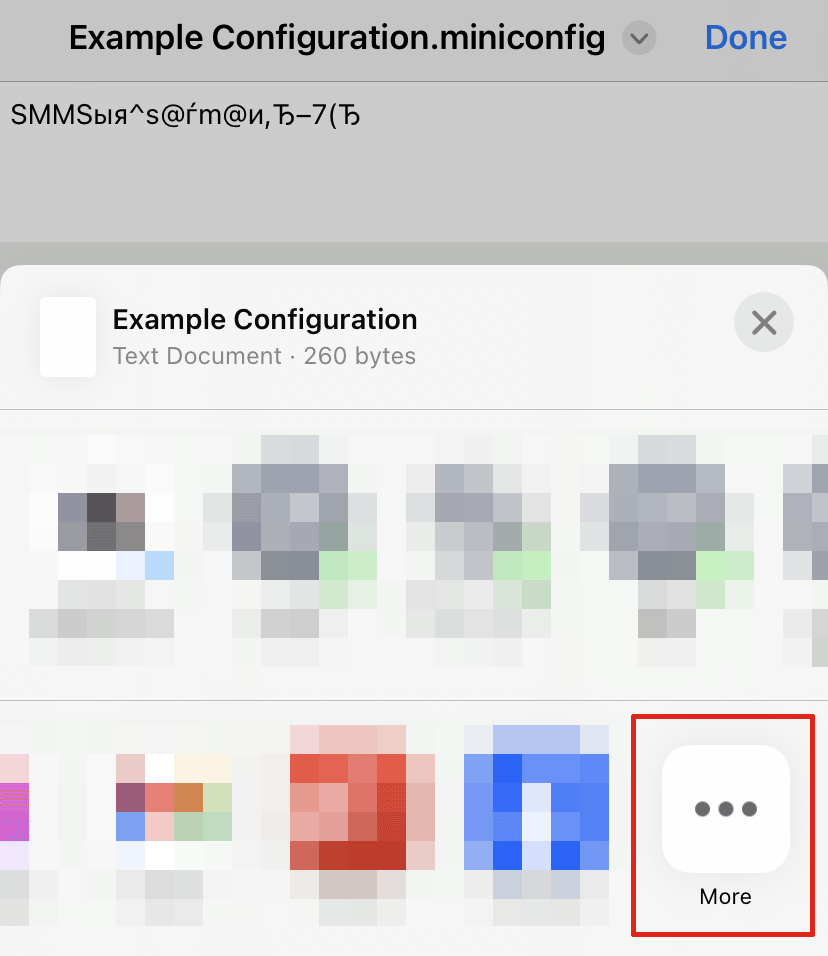
This will bring up an Apps list.
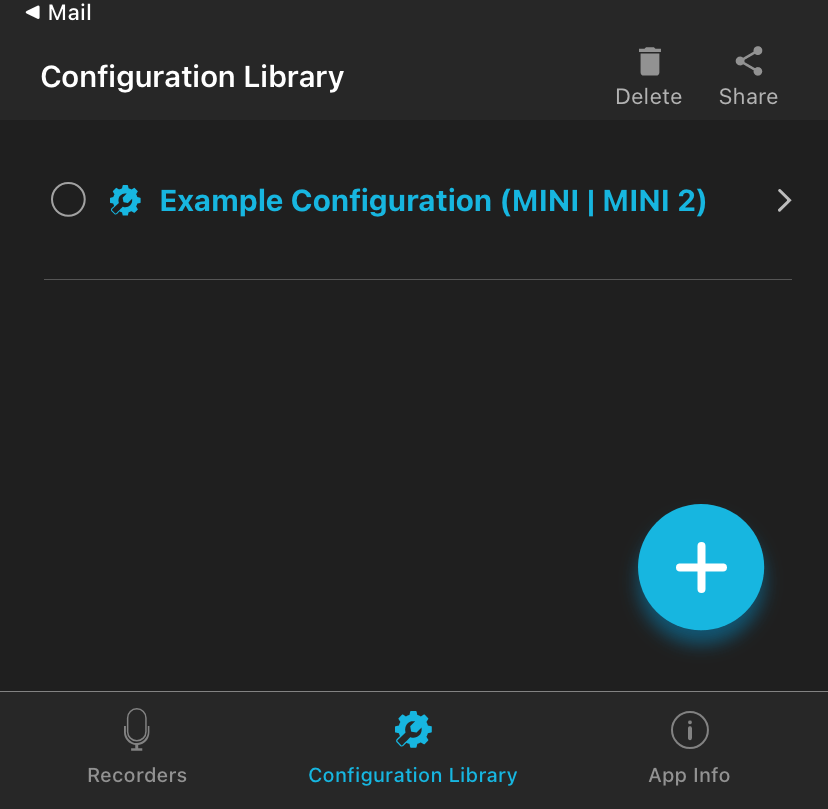
From the Apps list, tap the Song Meter app.

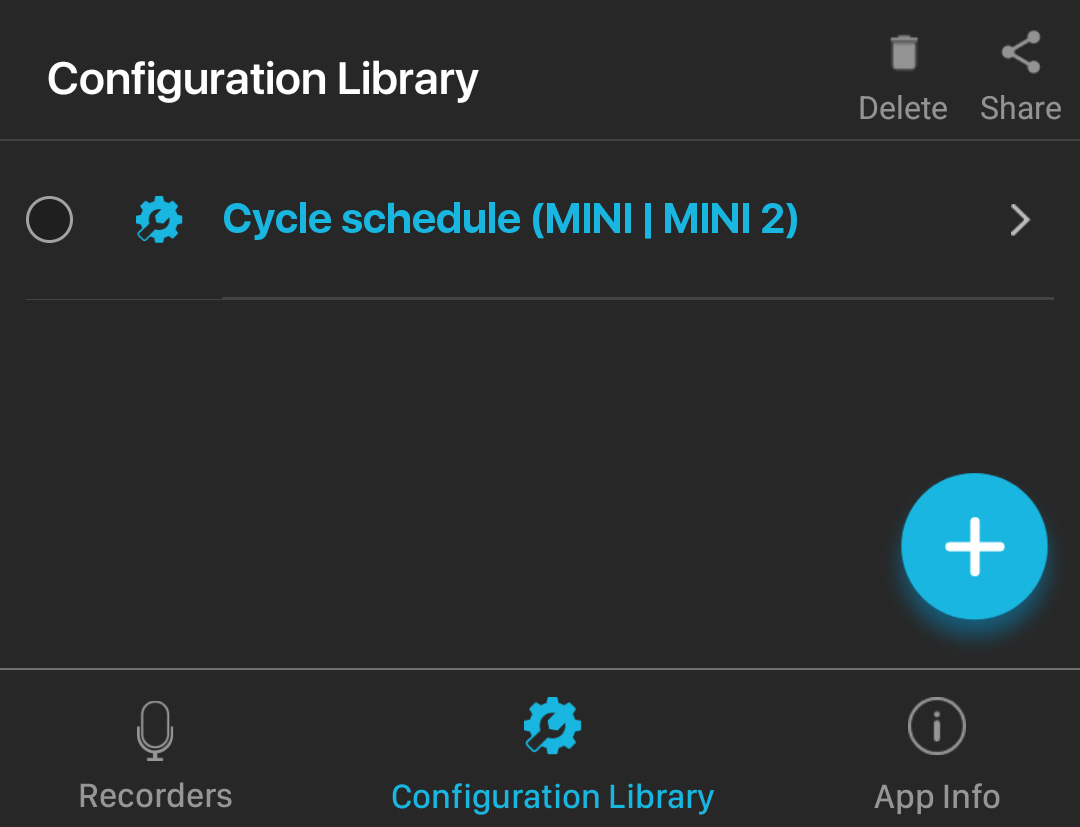
The Configuration file will be imported and visible in the Configuration Library.
 |
If a .miniconfig file is sent to you as an email attachment, you can import the file into the Song Meter Configurator's Configuration Library. Importing files sent via other means, such as a message app, a cloud storage app, or the device's file browser, works via a similar series of steps.
Open the Gmail app.
Open the message containing the
.miniconfigfile attachment.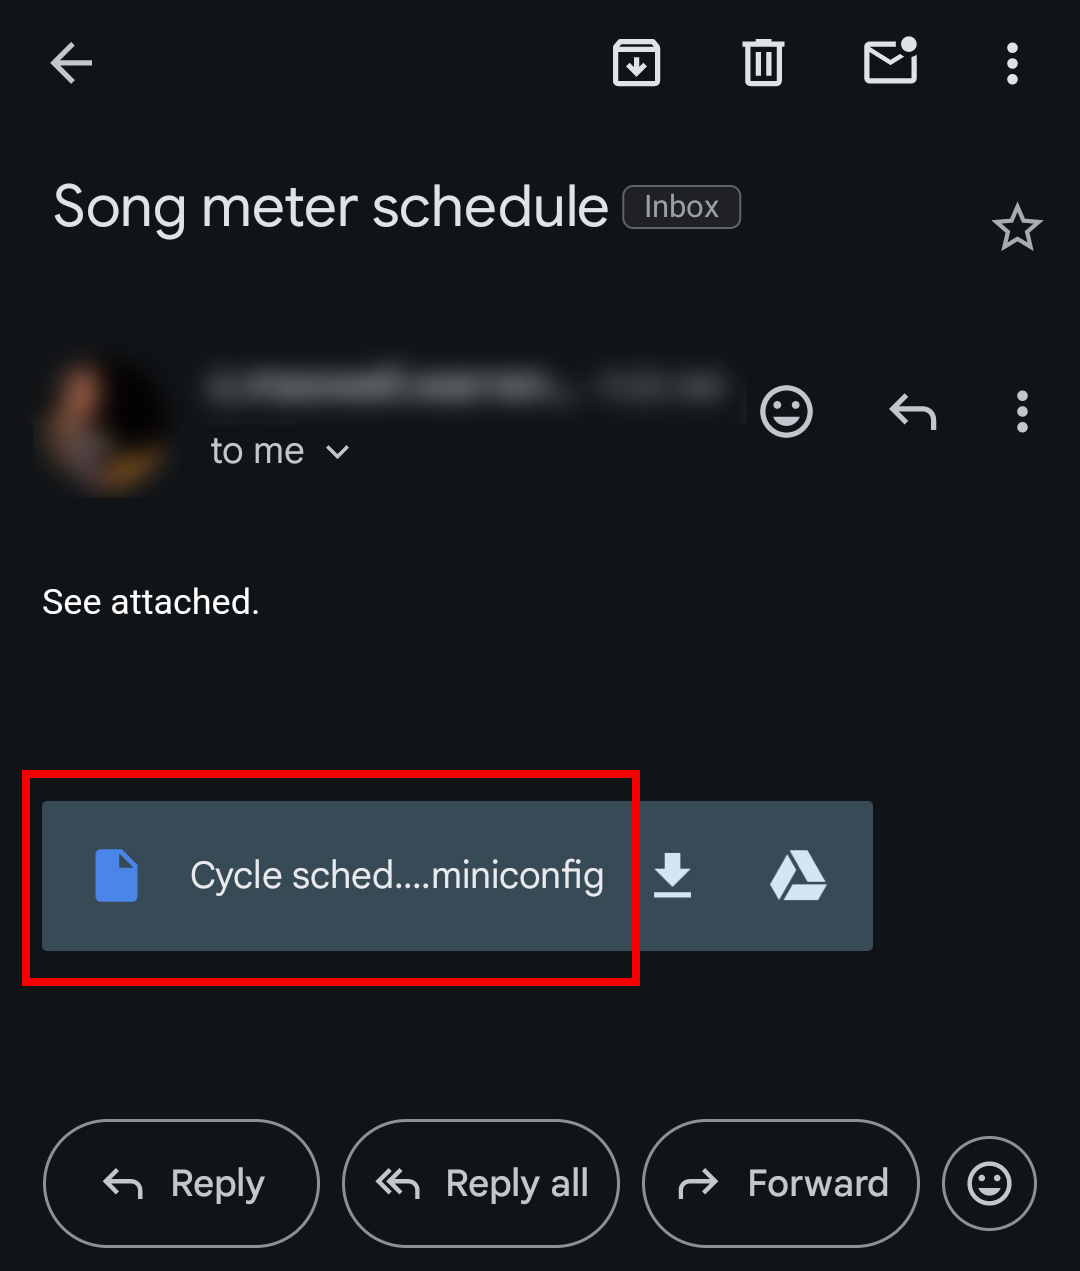
Tap on the attachment name. Do not tap on the Download or Google Drive icons.
The Configuration file will be imported and visible in the Configuration Library.
 |
Edit a Saved Configuration File
You can edit any configuration stored in the Configuration Library, whether it was created from scratch, saved from a paired recorder, or imported from an email or file storage app.
In the Configuration Library screen, tap on the name of the configuration you wish to edit.
The Configuration Editor screen opens.
Edit the settings and schedule (see Configuration Editor Screen).
Each settings change made to a configuration file is saved immediately.
Tap the Rename button at the top-right of the screen to rename the saved configuration File.
Tap the Configuration Name at the top of the screen to return to the Configuration Library screen.
Delete a Saved Configuration File
To remove a saved configuration from the Configuration Library:
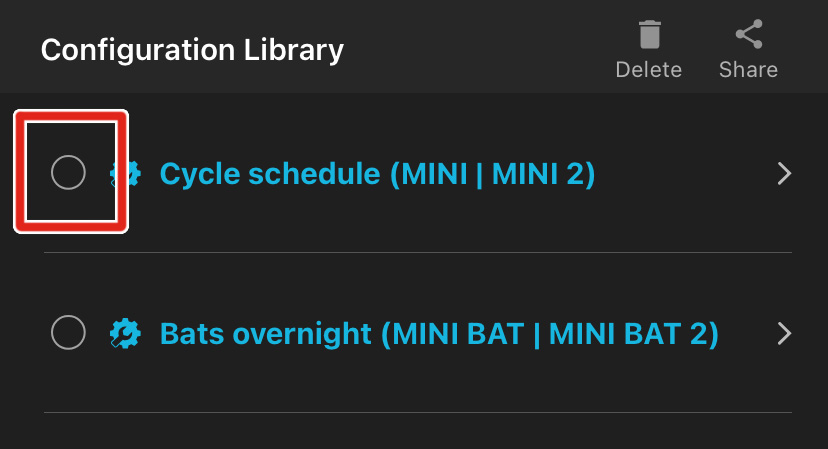
In the Configuration Library screen, tap on the selection circle to the left of any configuration to select it.
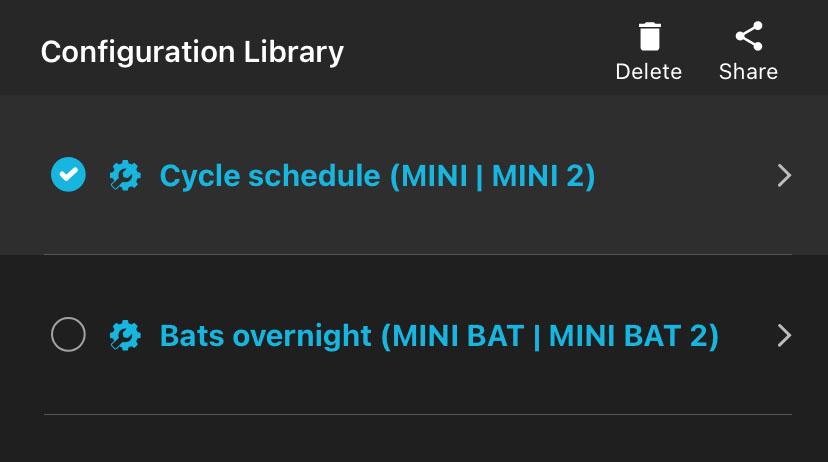
Selected configurations have the selection circle icon filled in with a check mark.
Repeat Step 1 to select multiple configurations, if desired.
Tap the Delete icon in the upper right of the screen.
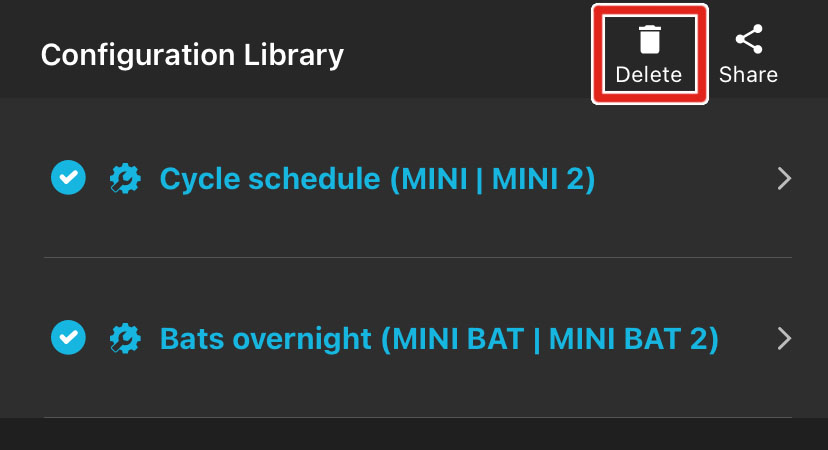
A message will ask if you're sure you want to delete the configuration.
Tap DELETE.
Share a Saved Configuration File
A configuration file can be shared to other iOS/Android devices or a computer. The configuration file has the file name suffix .miniconfig.
Shared configuration files can be transferred to an SD card directly from a mobile device with a file manager and SD card reader, or they can be sent to a computer for transfer to an SD card. The card can then be used to transfer the configuration directly to a recorder (see Load a Configuration File from an SD Card).
In the Configuration Library screen, tap on the selection circle to the left of any configuration to select it.
Selected configurations have the selection circle icon filled in with a check mark.
Repeat Step 1 to select multiple configurations, if desired.
Tap the Share icon at the top right of the screen.
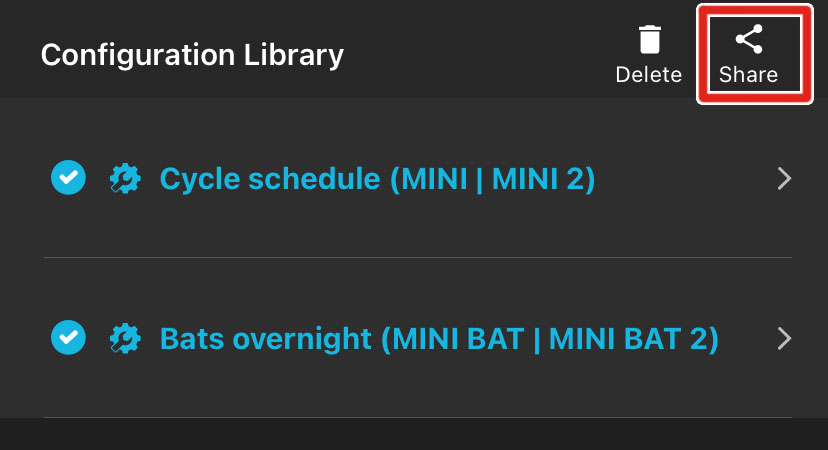
The iOS or Android interface for sharing files between applications will open.
From the operating system's file-sharing interface, select the desired method for sharing the file.
For example, you can send the configuration file as an email attachment or use your device's file manager to save the configuration file to an SD card.
Configuration Files on the SD Card
Configuration files can be exported from the Song Meter Micro 2 to its SD card or loaded from the SD card.
There are multiple ways to save a configuration file to an SD card:
If your mobile device can use an SD card reader, you can export a configuration file from the Song Meter Configurator app's Configuration Library to your mobile device's file browser to save it to the SD card.
See Share a Saved Configuration File for an example of exporting a configuration file to a separate app on your device.
If you export a configuration file to a desktop or laptop computer (via email or a cloud storage app, for example), you can use your computer to save the configuration file to the SD card.
See Share a Saved Configuration File for an example of exporting a configuration file to an email application.
It is also possible to import a configuration file from a microSD card to a paired Song Meter Micro 2. This allows you to use a single microSD card to program multiple recorders with identical settings.
To load a configuration file from an SD card to a paired Song Meter Micro 2 using the Song Meter Configurator app, see Load a Configuration to a Paired Recorder from an SD Card.
Settings Reference
This section provides a detailed description of each of the Song Meter Micro 2's available settings. The organization of this section mimics the organization of settings within the Song Meter Configurator app.
Options: 8,000; 12,000; 16,000; 22,050; 24,000; 32,000; 44,100; 48,000; 96,000; 192,000; or 256,000 Hz.
Default: 24,000 Hz.
Determines the number of samples per second used to make a recording during a recording period. Higher sample rates take up more SD card space for a given recording length, but they allow you to record a broader frequency range of sound (subject to the sensitivity of the microphone).
Choose a sample rate at least double the highest frequency you want to record. For example, a sample rate of 24,000 Hz will capture sounds up to 12,000 Hz.
Options: 1 minute to 60 minutes in 1-minute increments.
Default: 60 minutes.
Specifies the maximum length of individual recordings within a schedule. Long recording periods will be broken up into sections defined by this length. For example, if a recording schedule is set to record 24 hours per day, and the maximum record length is set to 60 minutes, the recorder will create twenty-four, 60-minute files per day.
Options: 6, 12, 18, or 24 dB.
Default: 18 dB.
Gain can be added to the microphone signal to increase the recorded signal’s amplitude.
Test recordings should be made to make sure desired signals are being recorded with enough gain, but not so much as to cause clipping distortion. If a test recording shows clipping distortion, lower the gain setting. If a test recording shows a faint signal, raise the gain setting.
Delay Start
The Delay Start setting allows you to program the recorder to not begin running its schedule until 12:00 AM at the start of the selected date, specified by year, month, and day.
For example, imagine you want the Song Meter Micro 2 to record only the winter season, but it would be much easier to reach the deployment site in the fall, before the first snowfall. This setting ensures the recorder will not waste valuable SD card space and battery life until the specified date.
If the Delay Start date is enabled, but you power on the Song Meter Micro 2 on or after the specified date, it will begin running its schedule immediately.
Configure Delay Start
The Delay Start setting can be configured directly on a paired recorder or when editing a configuration file in the Configuration Library.
Open the Configuration Editor.
Tap on the Delay Start entry to open a calendar interface.
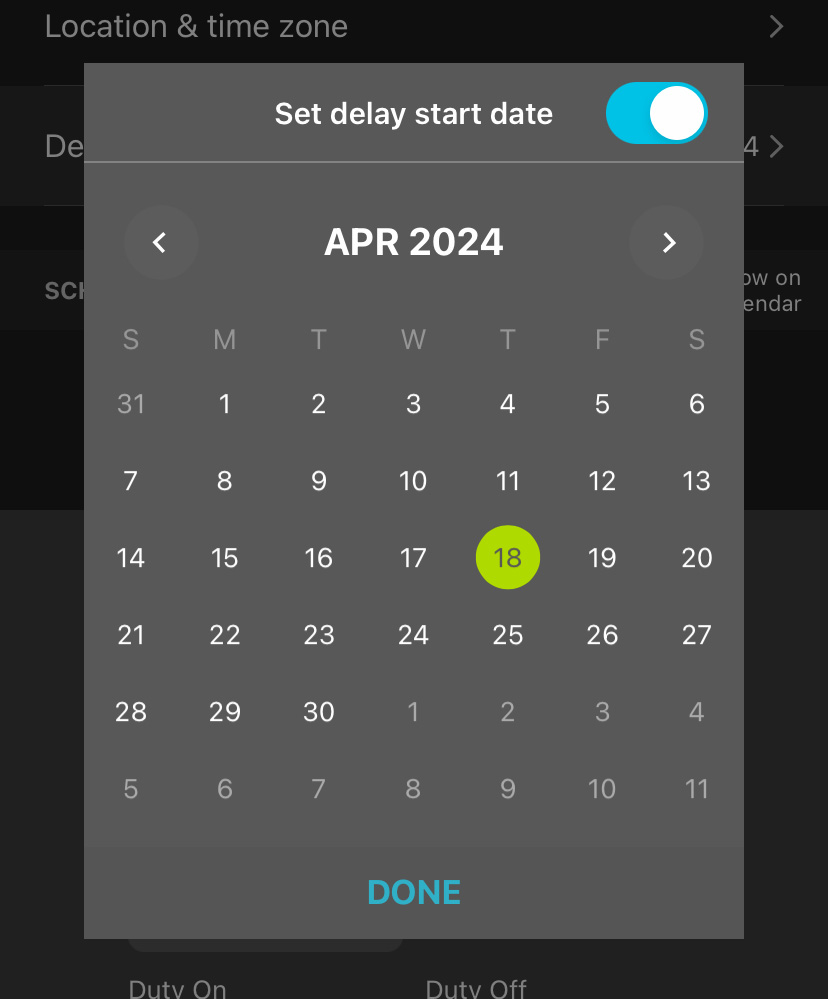
Tap the Set delay start date toggle switch to enable or disable the Delay Start setting.
When the toggle is enabled, the calendar is active.
Navigate between months using the left and right arrows below the Set delay start date toggle.
Select a date by tapping the corresponding entry on the calendar. The selected date is highlighted with a green circle.
Tap DONE to save your Delay Start setting.
Send Bluetooth Beacons?
Note
Send Bluetooth Beacons? can only be configured directly on a paired recorder, not via a configuration file. See Configure a Paired Recorder Directly.
Options: On or Off.
Default: On.
By default, a recorder that is powered on will send continuous Bluetooth beacons so the Song Meter Configurator app can detect the recorder and receive its current status.
If Send Bluetooth Beacons? is disabled, the Song Meter Configurator app will not automatically detect the recorder, and its current status will not be automatically updated. The recorder must then be manually paired with the Song Meter Configurator app in order for the current status to be updated in the app.
Disabling Send Bluetooth Beacons? will not affect the recording functions of the Song Meter Micro 2 recorder.
Tip
In most cases, we recommend keeping this setting enabled. Enabling Bluetooth beacons has no significant effect on the Song Meter Micro 2's battery life. Bluetooth beacons allow you to check the recorder's status when you are unable to access it directly, and they can help you locate a recorder after a long deployment.
Design a Custom Schedule
This section describes how the schedule system works and how you can design a custom schedule to fit your needs. It starts with the simplest and most common use cases and progress towards more advanced schedules.
In Schedules and Schedule Blocks, this section will start with the most basic element of any schedule: a schedule block. Just understanding this opens up many possible use cases, as many common types of schedules can be created using one schedule block comprised of a few simple commands.
Schedules Using Sunrise and Sunset introduces the ability to build schedules relative to sunset and sunrise as the lengths of day and night shift throughout a deployment.
Schedules with Multiple Blocks covers essential information about how multiple blocks behave in a single schedule.
Date Range and Day Duty Cycle describes how to program specific blocks within a schedule to run only during a specified date range and/or to cycle between running and not running on set intervals across multiple days.
Lastly, Schedule Block Examples shows schedule blocks for common use cases. You can use these examples by themselves, or incorporate them into a more complex schedule along with other schedule blocks.
Schedules and Schedule Blocks
A schedule for the Song Meter Micro 2 can be made up of up to ten schedule blocks. If a schedule block were just a single recording period, having only ten would be severely limiting. For instance, let's say you want to capture a short snapshot of a soundscape over the course of each day by recording five minutes at the start of every hour. If a schedule block only provided one recording period, you would need to tediously punch in separate start and end dates, and then you would run out before you even recorded half of your snapshots!
Luckily, this type of schedule can be programmed with just one schedule block:
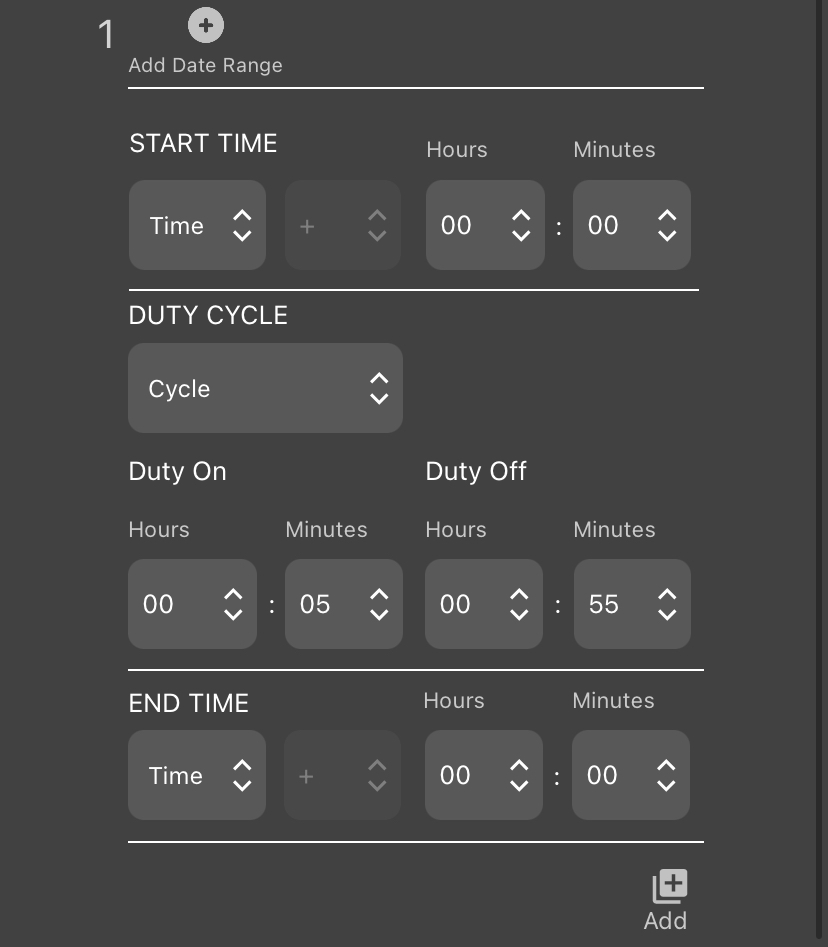 |
For accessibility and ease of reading on multiple screen sizes, further examples will only present schedules as plain text. The text below mimics the commands shown in the screenshot above.
START TIME: Time 00:00
DUTY CYCLE: Cycle
Duty On: 00:05
Duty Off: 00:55
END TIME: Time 00:00
With five simple commands, this one schedule block has told the Song Meter Micro 2 to record five minutes at the start of each hour. The following sections expand on how each component works.
Note
This example does not use the optional Date Range feature. This means that, as soon as the recorder starts its schedule, this schedule block will perform the same thing every day. We'll cover the capabilities of Date Range in a later section.
START TIME: Time 00:00
...
END TIME: Time 00:00
The START TIME and END TIME commands are best understood in relation to each other. Everything the schedule block does occurs after the START TIME and continues until it reaches the END TIME. This is the case even when the START TIME and END TIME share the same value, as they do here. The schedule block will begin every time it reaches 00:00 (12:00 AM on the 12-hour clock) and it will do whatever you program it to do until it reaches the next 00:00. Each midnight, the recorder will simultaneously end one cycle of this schedule block and start a new one.
This same logic means that a single schedule block can span two calendar dates:
START TIME: Time 17:00
...
END TIME: Time 05:00
In this example, the schedule block will start running every time the clock hits 17:00 (5:00 PM) and will end the next time the clock hits 05:00 (5:00 AM), which will be the next day.
While this may seem obvious, understanding this now is important for when we later introduce START TIMES and END TIMES set relative to sunrise and sunset.
Note
When you start your deployment for the first time, the Song Meter Micro 2 will pick up in the middle of any schedule block that should be occurring at that time. The recorder does not need to wait for the next occurrence of the START TIME when it turns on.
In the engineering world, "duty cycle" describes a pattern of repeating activity and inactivity. This could be a pattern of "on" and "off" signals in a computer that alternate millions of times per second, or it could be a schedule whereby a manufacturing machine is run for three hours every day.
In Song Meter schedules, a duty cycle tells the recorder to alternate between recording and sleeping, at fixed time intervals, in between the START TIME and END TIME.
When DUTY CYCLE is enabled by selecting Cycle, the schedule block will begin at the START TIME by recording, then it will pause, then it will record, then it will pause, repeating this until the END TIME is reached.
Returning to our "Record 5 minutes every hour" example, the DUTY CYCLE section of the schedule block is:
DUTY CYCLE: Cycle
Duty On: 00:05
Duty Off: 00:55
At the START TIME, the recorder begins at the Duty On phase by recording for five minutes. Then, it runs the Duty Off phase by sleeping for 55 minutes. It will alternate between five minutes of recording and 55 minutes of sleeping for as many time as it takes to reach the END TIME.
The END TIME will immediately end the schedule block in the middle of either the Duty On or Duty Off phase. If the time span between the START TIME and END TIME is short enough, it is possible to end a schedule block before the recorder can complete a single cycle.
Schedules Using Sunrise and Sunset
We saw in Schedules and Schedule Blocks that the START TIME and END TIME of a schedule block can be defined as fixed times on the clock each day. We can also define the START TIME and END TIME relative to sunrise and sunset, which the Song Meter Micro 2 calculates each day based on its latitude, longitude, and time zone settings.
This means that, if your goal is to record the dawn chorus each day, the Song Meter Micro 2 can time its recording period to follow sunrise as it shifts earlier and later in the day over the span of weeks and months. This opens up a wide range of useful possibilities for bioacoustics applications.
Let's look at a variation of a typical schedule one might use for recording nocturnal animals.
START TIME: Set - 01:30
DUTY CYCLE: Always
END TIME: Rise + 00:45
The above example is more concise than the one shown in Schedules and Schedule Blocks, as it does not make use of the DUTY CYCLE feature. This schedule block begins 1 hour and 30 minutes before sunset, it ends 45 minutes after sunrise, and it runs uninterrupted for the time in between.
Let's break down the three commands.
The first command in this block is:
START TIME: Set - 01:30
Set means the START TIME is defined relative to the time of sunset on a given day. The negative sign, -, means the block starts earlier than sunset, and the offset, 01:30, means it starts 1 hour and 30 minutes prior to sunset.
If you want the schedule block to start exactly at sunset, you should set the offset to 00:00. The value of the positive or negative sign does not matter in that case.
Setting the DUTY CYCLE to Always means the schedule block runs from the START TIME to the END TIME with no pauses in between.
When Always is selected, the Duty On and Duty Off commands are not used.
The last command in this block is:
END TIME: Rise + 00:45
The structure of the END TIME command is the same as for the START TIME command. Selecting Rise means we're defining the END TIME for this schedule block relative to the time of sunrise on each day. The positive sign, +, means we want to specify a time after sunrise occurs. 00:45 specifies 45 minutes after sunrise.
Schedules with Multiple Blocks
In Schedules and Schedule Blocks and Schedules Using Sunrise and Sunset, we have seen that a single schedule block provides quite a bit of flexibility. Its start and end times can dynamically adjust to follow sunrise and sunset times, and the DUTY CYCLE feature can create patterns of alternating on/off cycles.
As mentioned before, a single schedule can be made of up to 10 schedule blocks. Here's what you need to know about using multiple blocks:
Ordering of Blocks
Within a schedule, it does not matter which block is positioned at the top of the list and which is at the bottom. The order does not mean one block is prioritized over another.
Block Independence
Within a single schedule, each block can have entirely different commands from each other. For example, the first block could have its START TIME and END TIME set as fixed times on the clock, with no duty cycle, and the second block could reference sunrise and sunset for either or both of its START TIME and END TIME and use a DUTY CYCLE.
Overlapping Blocks
When two schedule blocks have recording periods that overlap, the Song Meter Micro 2 treats the overlapping recording periods as a single, combined recording period.
For example, if block 1 includes a recording period from 13:45 to 14:15, and block 2 includes a recording period from 14:00 to 15:00, the Song Meter Micro 2 will treat the time from 13:45 to 15:00 as one single recording period, only broken up according to the Maximum Recording Length setting.
This is true regardless of whether each block is set to reference fixed times on the clock or sunrise/sunset. This is also true whether each recording period is a single, continuous schedule block or one recording period out of a longer, cyclical schedule block.
Date Range and Day Duty Cycle
By default, every Song Meter Micro 2 schedule block runs every single day, starting from when the recorder is powered on or until the Delay Start date occurs, if applicable.
By enabling the Date Range for a schedule block, you can specify a range of dates over which the schedule block should run, and/or you can define a cycle for the block to run for X days, then not run for Y days, then repeat.
These features can be set independently for each block in your schedule. For example, block 1 can be set to run every day, block 2 can be set to only run from July 1st to August 15th, and block 3 can be set to run for three of every seven days from June through September.
The rules for what occurs when multiple recording periods overlap, described in Schedules with Multiple Blocks, still apply.
Enable Date Range and Day Duty Cycle
To enable these features for any schedule block, tap the Add Date Range icon at the top of the schedule block. To disable these features, tap the Remove Date Range icon at the same position.
When these features are enabled, three new sections of the schedule block appear: START DATE, DAY DUTY CYCLE, and END DATE.
These commands work similarly to the START TIME and END TIME commands, described in Schedules and Schedule Blocks. START DATE sets the date when the block should begin running, and END DATE sets the date when the block should cease.
These dates can only be defined by month and day, not by year. Once the clock reaches the START DATE during any year, the block will run as specified until the next time the END DATE occurs, which may be during the same calendar year or the following calendar year.
If a schedule block runs through midnight, like a "sunset to sunrise" block, it will begin running at midnight at the beginning of the START DATE, and it will stop running at midnight at the end of the END DATE.
If the END DATE is set to the same date as the START DATE, or if it is set to one day before the START DATE, the schedule block will run year-round. This is useful if you want to use the DAY DUTY CYCLE feature without limiting the schedule block to a particular date range.
This command works similarly to the standard DUTY CYCLE command described in Schedules and Schedule Blocks. When this section is set to Cycle, you can define a pattern of alternating between running the schedule block on some days and not running on other days.
For the purpose of these commands, a day is defined as one calendar day, spanning from midnight to midnight. If the schedule block runs through midnight, it will begin at midnight at the start of the first active day and end at midnight at the end of the last active day.
Duty On defines how many days of recording you want to happen during the active phase of the duty cycle. These active days occur consecutively before switching to the inactive phase.
Duty Off defines how many days you want the recorder to skip this schedule block in between active recording days.
Active days and inactive days always occur as consecutive blocks. For example, if Duty On is set to three days and Duty Off is set to five days, the schedule block will run for three days in a row, then it will skip five days in a row, then it will run for three days in a row, and so on.
During "inactive days" for this schedule block, other blocks in your schedule may still run, depending on their settings. The START DATE, END DATE, and DAY DUTY CYCLE commands only affect the schedule block to which they are applied.
Schedule Block Examples
This section provides recording schedule examples that demonstrate how schedule blocks work. Most of these examples are built into the app and can be selected as starting points for customized schedules.
A schedule specifies the record start and end times, but does not necessarily result in a single file for the entire period.
Long recording periods will be split up into segments whose length is set by the Maximum Recording Length setting.
The following schedule records continuously all day and night, 24 hours per day:
START TIME: Time 00:00
DUTY CYCLE: Always
END TIME: Time 00:00
Whenever the start and end times are identical and the DUTY CYCLE is set to Always, the schedule will record continuously.
The following schedule records daily from 4:00 AM to 10:00 AM:
START TIME: Time 04:00
DUTY CYCLE: Always
END TIME: Time 10:00
The following schedule uses the DUTY CYCLE and records for five minutes at the beginning of each hour:
START TIME: Time 00:00
DUTY CYCLE: Cycle
Duty On: 00:05
Duty Off: 00:55
END TIME: Time 00:00
The following schedule starts every day at sunset and records until sunrise on the following day:
START TIME: Set + 00:00
DUTY CYCLE: Always
END TIME: Rise + 00:00
The following schedule uses two blocks. The first block defines a period relative to sunrise and the second block defines a period relative to sunset. The combined result records for two hours centered on sunrise and two hours centered on sunset.
Block 1:
START TIME: Rise - 01:00
DUTY CYCLE: Always
END TIME: Rise + 01:00
Block 2:
START TIME: Set - 01:00
DUTY CYCLE: Always
END TIME: Set + 01:00
Deployment Length Estimations
The Song Meter Configurator app can estimate the expected run time it will take the Song Meter Micro 2 to run out of battery power or SD card space. There are multiple factors that can affect battery life, so these estimations should be treated as approximate.
From the Configuration Editor screen, tap the Estimate battery and card life icon to open the Estimate battery and card life utility.
This utility estimates battery and SD card life for different battery types and card sizes, using the currently programmed schedule and settings.
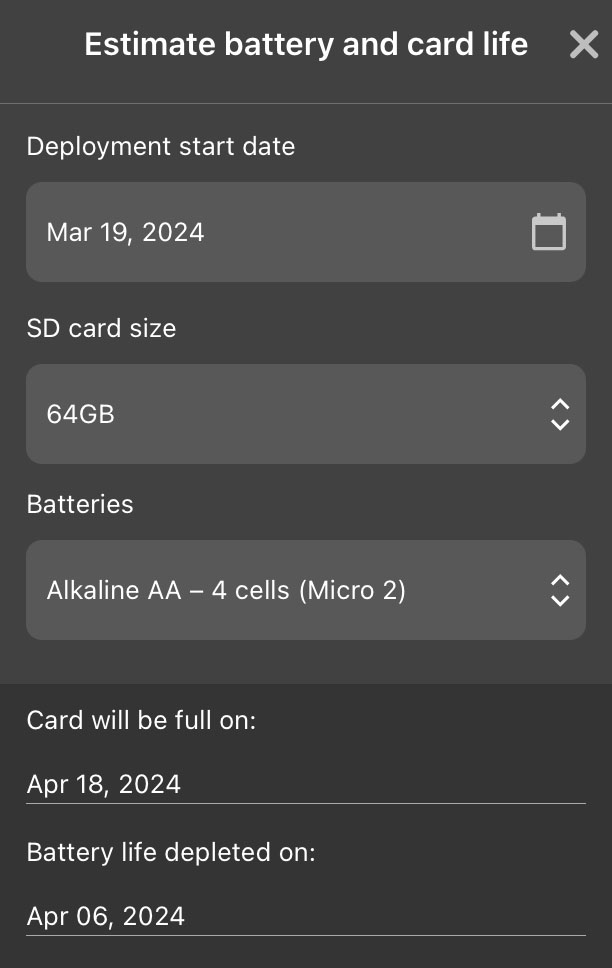 |
The Estimate battery and card life window contains the following elements:
X (exit) button | Tap to close the Estimate battery and card life window. | ||||||||||||||||||||||||||||||||||||||||||||||||
Deployment start date interactive calendar | Tap on the text showing the selected start date to open a calendar window and select a new start date. Changing the expected start date directly affects the estimated end dates for SD card space and battery life. This date only affects the estimation; it does not affect when the recorder will start running its schedule. To specify an initial delay in the recorder's schedule, use the Delay Start setting. | ||||||||||||||||||||||||||||||||||||||||||||||||
SD card size dropdown | Select the SD card capacity to use for estimating when the card will be completely full. The options include the most common SD card sizes between 8 GB and 2 TB. If configuring a paired recorder, the Use Current Card option bases the estimation on the remaining available space on the installed SD card. | ||||||||||||||||||||||||||||||||||||||||||||||||
Batteries dropdown | Select type and quantity of batteries to use for estimating when the batteries will die. If configuring a paired recorder, Use Current Batteries measures the voltage of the installed batteries and estimates the remaining available energy. | ||||||||||||||||||||||||||||||||||||||||||||||||
Card will be full on: | Displays the date on which the card is estimated to be full, based on the recorder configuration and SD card settings listed above. The SD Card estimation assumes the recorder never runs out of power. | ||||||||||||||||||||||||||||||||||||||||||||||||
Battery life depleted on: | Displays the date on which the batteries are estimated to lose power, based on the recorder configuration and battery settings listed above.[a] The Battery Life estimation assumes the recorder never runs out of SD card space. | ||||||||||||||||||||||||||||||||||||||||||||||||
[a] For a full table of the power consumption measurements that inform these battery life estimations, see Power Consumption and Expected Battery Life. | |||||||||||||||||||||||||||||||||||||||||||||||||
Battery life estimations are based on measurements taken with typical SD cards at room temperature. These estimations should be treated as very broad, as many factors can significantly affect power consumption. These factors include, but are not limited to:
SD Card Power Consumption
SD cards vary significantly in how much power they require. Even SD cards of the same model and size from the same manufacturer can exhibit this variation. The power consumption of an SD card can have a noticeable affect on the power consumption of the Song Meter Micro 2 overall.
Ambient Temperature
Most types of batteries experience diminished performance in cold weather compared to room temperature. The magnitude of this effect is different for various battery chemistries. For example, alkaline AA batteries can have their performance reduced by 50% or more in freezing temperatures.
When you select a preset SD card size in the Estimate battery and card life window, the estimation assumes that all of the card space is completely unused. Reformat the SD card before each deployment to ensure that this is the case (see Format the SD Card).
For acoustic recording, SD card usage is very predictable. Assuming the SD card used during the deployment is freshly formatted and does not encounter an unusual issue, the date at which the card fills up should be very close to the estimation shown on the Estimate battery and card life window.
[3] Support for underscores was added in firmware version 4.4 and Song Meter Configurator app version 2.2.